Cover
All Aboard!
Start With The Basics
Why The Track Is So Important
How Does The Power Supply Work?
Analog
and DCC Explained
Layout Options Explained
Locomotives And Rolling Stock
What Should You Start With?
How Do You Create A Good Layout
More On Layouts and LDE
How to Create Realistic Scenery
Explain Weathering Techniques
How To Repair Problems
BONUS SECTIONS
Frequently Asked Questions
Glossary of Important Terms
Model Railroad Yard Design Explained Step-By-Step
Model Train Layout Track Plans
Garden Railroads
Mastering An Airbrush Step-By-Step
More
Model Railroad Resources
Model
Railroad Yard Design
Explained Step-By-Step
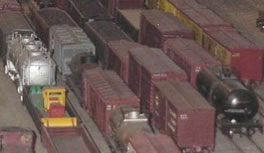
Most model railroaders have far more cars (rolling stock) and locomotives than they can possibly operate at once. One option is to simply store excess cars and locomotives in boxes or on display shelves or cabinets. It is possible, however, to store all of your extra equipment on tracks in a yard that may or may not be part of the visible operating portion of your layout.
However, design mistakes are a common feature of yard layouts. Yards don't always work out as well as they should. A major cause is the lack of available information on how to design a good yard layout. Without the resources, model railroaders are forced into a lot of guesswork. Hence the reason for this bonus section.
Apart from the lack of available information on the subject, another cause for less than satisfactory yard designs, is the need to compress a layout into the space available. 'Compression' is the model railroaders enemy, but in most cases, necessary. Here's why...
The Need To Compress The Layout
Take for instance the average layout which might include a yard, a main line and perhaps a branch line. Most model railroaders have limited space available to them, so can only hope to include a few scale miles of track to represent a 100 or so miles of full-size (prototype) track.
In reality; something has to be left out in order to fit into the average layout space. On most layouts it's usually the long, boring miles in between the interesting spots that get cut out. For the same reason, yards are often rationalized in some way.
Like it or not, it's often
necessary to compress the essence of the operation down to a manageable
and modelable level. So, it is not uncommon for model railroaders to compress
three yards into the space of one, forcing one or two tracks to do the
work of many miles of prototype track. One downside is that this imposes
more pressure on anyone operating your yard. The operator will often have
to do nearly as much work as a prototype crew to get through a session.
Return
to top of page
What Is A Classification Yard?
In simple terms, 'Classification' is the sorting of railroad freight cars
into groups bound for one or more similar destinations. This is the most common type of yard found on model railroads, and when well executed, is fascinating to operate.
Let's start by looking at the make up of real classification yards. Generally, they are huge. They often consisting of many smaller special-purpose yards, that collectively, add up to a complex array of track.
It is commonplace for there to be three separate double-ended yards strung one after the other. These are designed to move traffic efficiently and usually comprise: an arrival yard, a classification yard, and a departure yard. Let's look at these separately:
- The arrival yard is where arriving trains drop off the cars of their train.
- The cars are then moved to the classification yard, being switched back and forth as necessary to get the right cars onto the right trains.
- The trains are then built out and moved to the departure yard. After getting a new caboose and locomotive, they then proceed to their next destination.
Trains moving in the opposite direction are often served by an identical set of yards on the other side of the main line.
The possibilities are
endless, depending on the types of jobs that need to be done. Here are
4 common options:
1. Small branch line yards where
the main track is the only lead.
2. Industrial yards used to store
and move parts and materials.
3. Coach yards where passenger trains
and cars are serviced and lay over for their next scheduled journey.
4. Sprawling division point freight
yards with humps that take up many square miles.
Each is different and
designed to do different jobs. So, when designing a yard layout it is
always important to carefully consider the purpose and operation of the
yard to be built and what is expected from it. Understand the reasons
why things work the way they do, then apply the knowledge to the specific
needs of your layout. Some aspects will need to be adapted, or compressed,
so in most cases compromise is inevitable.
Return
to top of page
9 Steps To Creating Classification Yards
(Note: these are guidelines only and some variation may be needed depending on the type of yard layout you are creating.)
Step 1: Make Your Yard Easily Accessible
You'll get more enjoyment out of running, or working on your layout, if everything is within easy reach. 24" to 30" is about as far as most people can reach without having to overstretch themselves and risk knocking over trains or scenery.
If you want to make your yard wider than you can reach from one side, then
consider including a shallow operators’ aisle on the other side of the yard.
To do this you need about 16” of aisle, and a few feet to either side allowing the operator to reach the critical points around the turnouts. A yard operator usually stays in one place during a session so it could be a crawl-under without access to the rest of the aisles.
By doing this you can then split the yard into two manageable halves. This works well with double-track layouts. Having two switching crews has its benefits too.
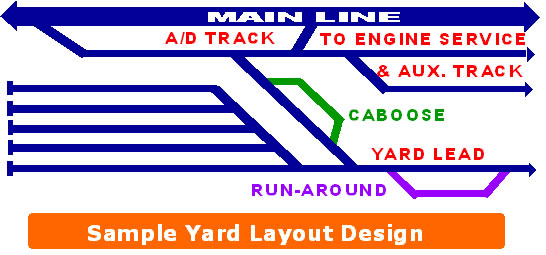
Step 2: The Main Line Deserves Priority
It is easy to overlook that the main line is a part of the yard... it is the most important track in it, or around it.
Prototype railroads go to great lengths to keep the main line clear. The same rule applies to a model railway. The main line is the artery that carries the life blood of the railroad, passengers and freight. Just like the arteries of a human body, the main lines need to be kept clear to allow for the free-flow of traffic. Obstructing the main lines causes major problems to the railroad system.
Ideally the main
line should only have two turnouts leading to the yard, one at each end.
And they are only used when complete trains either enter or leave the
yard.
However, in saying that,
it isn't always necessary when planning a small stub-end terminal yard,
or a yard for a lightly used branch line. If the branch line only supports
one or two trains a day, and trains should proceed at restricted speed
and be ready to stop for any obstruction. There usually isn't a problem
with using the main line, even as a lead track.
Return
to top of page
Step 3: Have A Dedicated
Lead Track
The lead is the backbone of the yard. It is the next most important track in the yard after the main line. The lead is the track all others either connect to or branch from. The lead can be disguised as a branch line or another kind of track depending on your layout. However, the real purpose for the lead track is an important consideration when planning a yard layout.
The yard switcher should always be able get to any track in one forward move, and to escape back to the lead from almost anywhere in the yard in one reverse move. Therefore, where possible, most (if not all) turnouts off the lead should be facing-point turnouts.
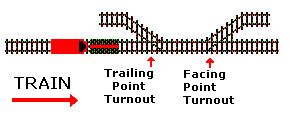
This might not sound important, but it is. Here's why... any track on a trailing-point switch that has to be served from the lead requires the switcher to do one of two things. Either run around a car (or cars), or to make a reverse move off of the lead to serve that track, and leave the lead. This usually causes delay with two additional moves... and gives limited access to the track(s) being worked... and there is the possibility of fouling moving traffic across other tracks.
Here is an example to illustrate the the point. In the diagram the switcher would experience a problem serving the trailing-point turnout on the left. When building trains, the switcher should never have to leave the lead track under any circumstances and should almost always work cars from only one end (the front).
The lead must be as long, or longer than, the longest yard track, because the switcher uses the lead to move cars in and out of the body tracks. This avoids the need for the switcher to "double" a cut of cars to move from one track to another. Although it isn't always possible to have a full-length lead, having one will alleviate a lot of headaches!
Step 4: Keep The Yard Lead Clear
Let's review the progress to date. In step one we made the yard accessible. In step two we cleared the main line. Then, in step three we gave the switcher a track of it's own to work from.
The next step is to keep the yard lead clear at all times. In reality, this is easier said than done, but with careful planning a yard, many potential problems can be avoided. For instance; try to avoid including crossovers or other trackage arrangements that interfere with the yard lead or the ability of the switch crew to do an efficient job. Frequent delays and chaos are a characteristic of yards with active tracks that cut across the lead.
keep the yard clear can't always be avoided, but careful planning at the design stage can minimize or eliminate potential problems.
Step 5: Use Arrival/Departure Tracks (A/D Tracks)
The next logical question is how do you get trains on and off the main line and into the yard, without obstruction the main line or the yard lead. To do this you include a special track(s) called arrival/departure (A/D tracks).
In simple terms the A/D tracks are sidings off the main line with a connection to the yard lead. This is where trains are stored for a short time while they are broken down or built up.
The A/D track is a temporary holding track off the main line and should never be used as an extra classification track. The problem is, that when
another train arrives, you have nowhere to put it. So avoid using A/D track as classification track.
The yard switcher should be able to cross over from the lead, grab a cut of cars from the A/D track and pull it directly onto the lead to classify it in just two moves. Easy!
Having more than one A/D
track can be useful especially if you have the space available. This way
you can make or break more than one train at a time. The key is to always
make sure that you can get to each one via the yard lead in just one move.
A good idea is to place the A/D access track from the lead on the near
end of the first A/D track (this is near where it joins the main line).
You then build a ladder track just beyond that for all your other A/D
tracks.
Return
to top of page
Step 6: Include A Run-Around
At times the yard switcher will need to run around other cars. So, it is a good idea to include a short siding or set of facing crossovers to an adjacent track. This could be on or off the lead.
As a minimum, you'll need enough space to run around one long passenger car. If you have more room then the longer the run-around the better. You may also want to add more than one run-around.
Having a run-around has its advantages. Without a run-around it can be frustratingly difficult to tack a caboose onto the back of a departing freight train. The engineer would need to back his whole train into the caboose track. A run-around is also helpful if you have yard or industry tracks with trailing-point switches within yard limits.
Step 7: Include A Caboose Track
There needs to be a place in the yard to store cabooses out of the way while you are classifying trains. They still need to be easily accessible, so it could be a double-ended siding, or a stub. If you're using a stub track, make sure it is
easily accessed from the yard lead and that it is from a facing-point
turnout. |
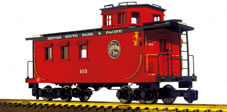 |
The logical place for a caboose track is off the A/D track, because that's where you are building or breaking trains. However any easy to access location will work. A caboose track could therefore be located off either the yard lead, yard ladder, or one of the A/D tracks as already mentioned.
A caboose track is an ideal way to display your caboose models and will improve the efficiency of your yard.
Step 8: Add Auxiliary Yard Track
Yard operation is not just about classification. Some of the best local operation in a yard comes from the auxiliary yard tracks: ready tracks
for wreck trains or snowplows, a cleaning track for house cars, icing tracks for reefers and RIP (Repair In Place) track. Auxiliary track doesn't necessarily need to be immediately alongside the yard.
RIP track (Repair In Place) is worth considering as it is an integral part of many prototype classification yards. Several cars each day are directed to the RIP track for minor repairs like: replacing worn brake shoes, fixing dragging equipment, or changing a cracked air hose, or a damaged wheel bearing. After repairs are completed each car is sent on its way.
A classification yard set can operate at a crew change or division point. It can be a busy place (especially when steam locomotives are involved). This is where engines spend time in the yard laying over... waiting for trains to pull out, getting much needed service, or just on standby. This is why you need a place to hold them out of the way until they are needed.
Locomotives need to get away fast and easily, so your engine service tracks should allow direct access to and from your A/D tracks. These tracks can look really impressive with the addition of services like: water towers, diesel fuel racks, coal docks, sand towers, ash pits and cinder conveyors etc. Remember, locomotives are generally serviced as they arrive at a yard, not as they leave... so if you have more than one service track, concentrate the services along the inbound lead.
Step 9: Avoid Unnecessary Congestion In The Yard
The purpose of a classification yard is to collect incoming cars, rearrange them and get them on trains that will take them to their destinations.
Now, it's true that most yards have busy times. Several trains can arrive in quick succession and overwhelm even the best yard crew. The regular arrival of new cars can cause a bottleneck and the yard can quickly clogg-up. This is frustrating for all concerned especially when it brings the railroad to a complete standstill.
No yard can run efficiently when put under too much pressure. To continue to function well, all yards have a certain threshold number of cars they can hold. Go beyond this threshold amount and the yard quickly clogs, making it very difficult to work with.
The yard size and physical restrictions will determine what the threshold number is. Efficiency in classification is particularly important at busy times. Another factor, is whether the train schedules (timetables) allow the yardmaster to move cars regularly on outbound trains, as quickly as they arrive. With this in mind, the schedule becomes a key determinant as you start pushing things to the limit of the yard threshold.
As well as a physical threshold there is also a human threshold. There is a limit to how many cars a yardmaster can classify in a set period of time. The situation can quickly deteriorate when more cars are coming into the yard than the yardmaster can handle. When the thresholds are pushed to the limit, the yard can quickly become unworkable and all movements can grind to a standstill.
For instance; a big yard might have as many as 200 to 400 cars through it in a four hour operating session... but if everything converges on the yard at once, or if there is little movement for a couple of hours... then no yard or yardmaster is going to be able to cope with the resulting congestion. Careful scheduling is therefore critical to avoid overwhelming the yard or crew.
The main thing is to plan the layout design of your yard carefully, then run it efficiently and keep cars moving to schedule. It's when yards get congested that problems occur. Even with the best of intentions, there will be occasions when surges in traffic will drive the number of cars beyond the threshold. In these situations it is important for the yardmaster to clear some cars out of the yard as quickly as possible to prevent the problem from escalating out of control.
How full is full? Well, generally a half full yard.... is full! As a rough guide you simply calculate how many average length cars you can hold in the body of the yard when all tracks are full... without fouling any of the turnouts. You then take that number and divide by two. The resulting number is your threshold amount. It could be slightly higher or lower depending on your yard design.
If you have followed each
of the preceding 9 steps, then by now you will be well on your way to
designing an excellent yard layout. The steps will not only help with
the smooth operation of your yard... they will also minimize any level
of frustration. So, please read and reread them carefully.
Return
to top of page
6 Tips To Make Your Yard Easy To Run
Even with the best yard design... and the best intentions... the yard won't get used if it's not user-friendly. Therefore; it is important that your yard is easy to run, not just for you, but for anyone else who is called upon to operate the yard. Here are 6 ways to make things easier:
1. Poor trackwork can lead to ongoing problems and frustration. It is well worth spending extra time to get the trackwork just right. It is no fun when trains keep derailing every time they go over a bad turnout, or over a spot that's out of gauge. Despite your best efforts derailments can still happen, so it is important that every part of the track is easily accessible, either from the front of the layout or from an operators aisle behind.
2. Color code the track lines to differentiate what each track is for and install a large, easy-to-read schematic control panel. As an example, you might want to make the body tracks white, the yard lead blue, the A/D tracks red, etc. The next thing is to label anything that might be confusing. Physically separate adjacent tracks with different purposes to emphasize their difference.
3. Problems can occur when a new operator takes control, so it pays to train each new operator before he or she is let loose in the yard. A flow diagram of the yard is a good staring point. It could be prepared as a handout and include a brief explanation of the different functions of each track. It is a good way to avoid any confusion, save time and minimize potential errors. The handout would also be of interest to spectators as it is easy way to explain how things work.
4. For the yard crew to organize their work efficiently they need a schedule of arrivals and departures. It needs to describe the anticipated movements during each session, the approximate arrival and departure times, and what type of freight or passenger equipment each train will drop off or pick up. This schedule needs to be in place before the start of each operating session.
5. Where possible avoid making things too complex. For instance; wherever you have a crossover where two turnouts always operate together, control them with one toggle switch. Use a diode-matrix panel or similar control structure to automatically throw turnouts in a yard ladder for a particular arrangement.
Although this might sound complex it makes a stressful job easier when in full operation.