Cover
All Aboard!
Start With The Basics
Why The Track Is So Important
How Does The Power Supply Work?
Analog
and DCC Explained
Layout Options Explained
Locomotives And Rolling Stock
What Should You Start With?
How Do You Create A Good Layout
More On Layouts and LDE
How to Create Realistic Scenery
Explain Weathering Techniques
How To Repair Problems
BONUS SECTIONS
Frequently Asked Questions
Glossary of Important Terms
Model Railroad Yard Design Explained Step-By-Step
Model Train Layout Track Plans
Garden Railroads
Mastering An Airbrush Step-By-Step
More
Model Railroad Resources
Model Train Layout Track Plans
These model railroad track plans have all been designed for the scale indicated, and can be freely copied as long as they are not sold or offered as part of a commercial product.
The grid on the plans, when it exists, is 1 x 1 foot for the scale indicated.
You can convert any plan to another scale if you want to use a plan in a scale other than the one it is designed for.
O scale = 1:48, S scale = 1:64, HO scale = 1:87, TT scale = 1:120,
N scale = 1:160, Z scale = 1:220
The minimum radius on these layout plans is 18 inches so that there are more options regarding use of different locos and rolling stock. All industries indicated are SUGGESTIONS only. All industries indicated are SUGGESTIONS only.
World's Oldest Hobby? About 500BC the emperor of the Q'in (pronounced 'Chin'. Chin is where the name China came from) dynasty wanted to view all the different regions of his empire. But of course it was impossible for him to be in all the regions of his empire at once. So he commissioned some artists in his empire to visit each region and make models of each region, so that he could view them all from inside his palace in the forbidden city. Once each diorama was completed, it was placed on a map the empire that was carved into the floor in part of his palace. And so each day he would travel through his whole empire, admiring the beauty of his kingdom. The dioramas were called 'penjing'. China in 500BC didn't have the benefit of Woodland Scenics scatter and trees, or similar materials, and so the dioramas were made from real dirt and rocks, and small trees that were alive. The art of Bonsai owes it's existence to these penjings, and it would seem that maybe the 'art' of Model Railroading does too! (Source: Better
Homes and Gardens, July 2004 issue)
|
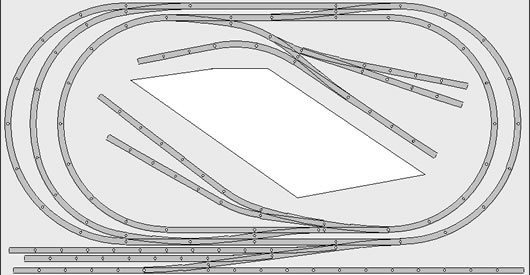
Minimum Space HO Layout (4x4 feet)
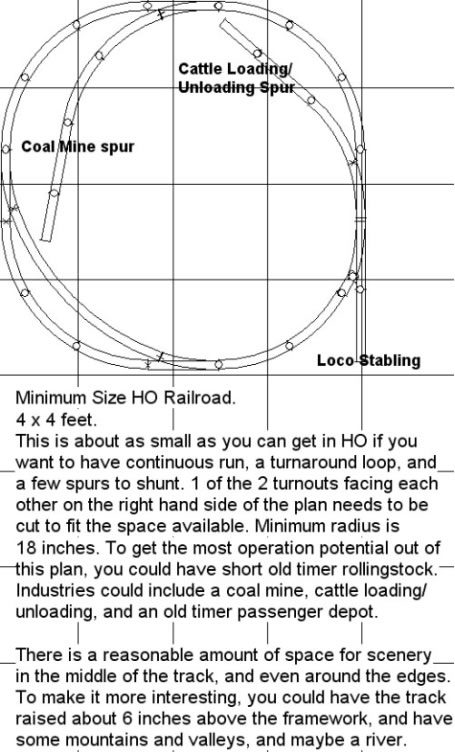 |
Parts List - Minimum space layout (4x4)
1 Flex
track (Minimum 3ft long)
3 9" Straight
14 Full Section 18" radius
2 6" Straight
3 Snap-Switch, left
2 Snap-Switch, right
Return to
top of page
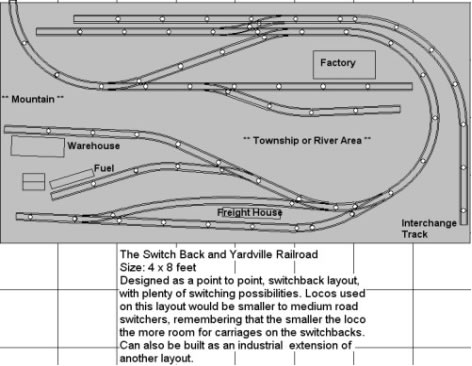
Switchback
& Yardville Layout (8x4 feet)
Parts
List - Switchback & Yardville layout (8x4)
2 Flex track (Minimum 3ft long)
7 9" Straight
4 22" Radius
29 9" Straight
8 Full Section 18" radius
4 22" Radius
1 3" Straight
1 1/2 section 15" radius
1 1/3 18" Radius
3 Snap-Switch right
6 Snap-Switch left
2 3" Straight
1 2" Straight
Click
The Link Below To View The |
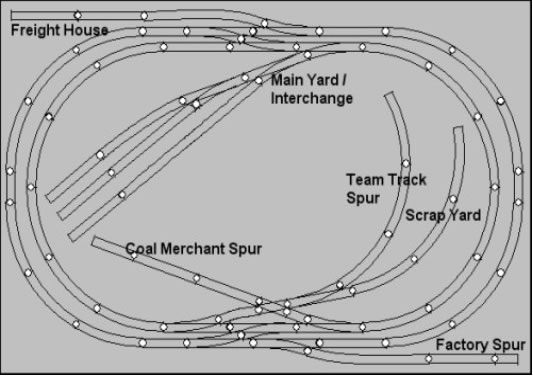
Mainline & Industrial Layout (8x4 feet)
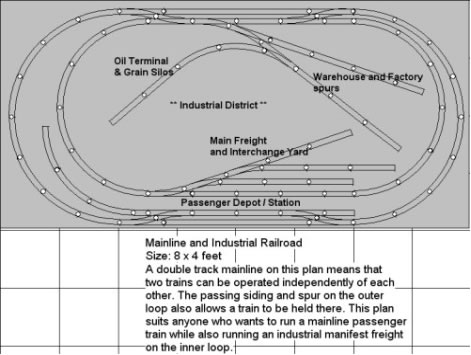
Parts List - Mainline & Industrial layout (8x4)
2 Flex track
(Minimum 3ft long)
22 9" Straight
17 Full Section 18" Radius
16 22" Radius
4 6" Straight
1 3" Straight
6 Snap-Switch, left
8 Snap-Switch, right
Mountain
Railroad Layout (8x4 feet)
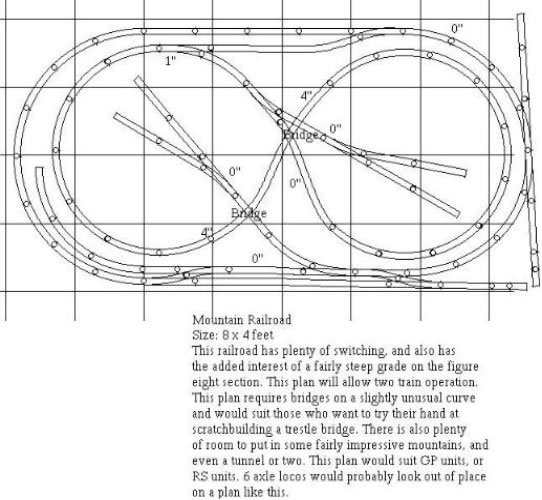
5 flex
track (Minimum 3ft long)
17 9" Straight
20 Full Section 18" Radius
12 22" Radius
2 6" Straight
3 3" Straight
1 1 1/2" Straight
7 Snap-Switch, left
5 Snap-Switch, right
Return
to top of page
Mineral Mountain Railroad Layout (8x4 feet)
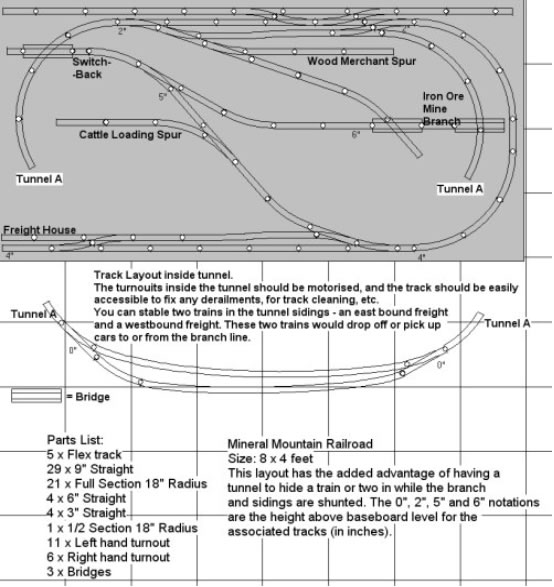
Mineral Mountain RR layout (8x4)
5 Flex track
(Minimum 3ft long)
29 9" Straight
21 Full Section 18" Radius
4 6" Straight
4 3" Straight
1 1/2 Section 18" Radius
11 Snap-Switch, left
6 Snap-Switch, right
3 Warren Truss Bridge
Spaghetti
& Western Railroad Layout (8x4 feet)
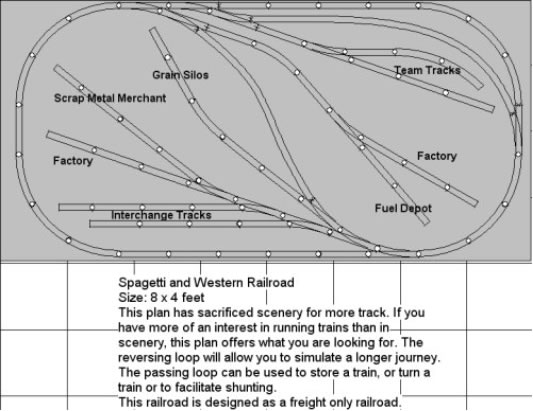
Parts List - Spaghetti & Western RR layout (8x4)
3 Flex track
(Minimum 3ft long)
37 9" Straight
13 Full Section 18"
3 22" Radius
4 6" Straight
6 Snap-Switch, left
7 Snap-Switch, right
North
East Line Layout (8x4 feet)
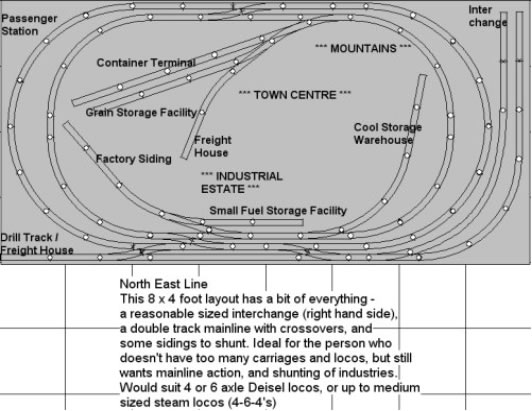
Parts List - Northeast Line layout (8x4)
2 Flex track
(Minimum 3ft long)
26 9" Straight
19 Full Section 18" Radius
16 22" Radius
4 6" Straight
6 Snap-Switch, right
9 Snap-Switch, left
Click
The Link Below To View The |
Denver
Rail Link Layout (8x4 feet)
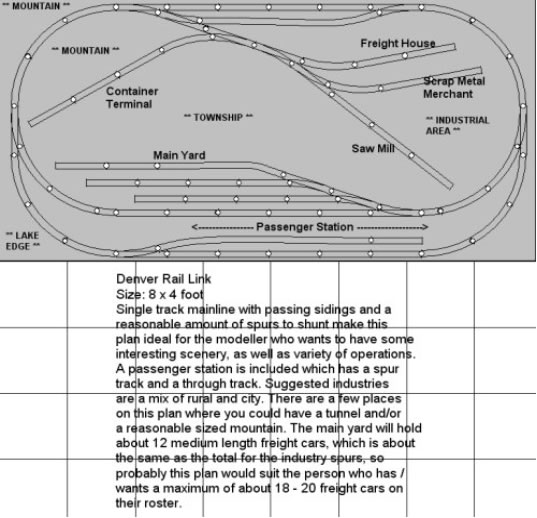
Parts
List - Denver Rail Link (8x4)
3 Flex track (Minimum 3ft long)
35 9" Straight
19 Full Section 18" Radius
2 1/3 18" Radius
8 Snap-Switch, left
4 Snap-Switch, right
Return
to top of page
Red
River Railroad Layout (8x4 feet)
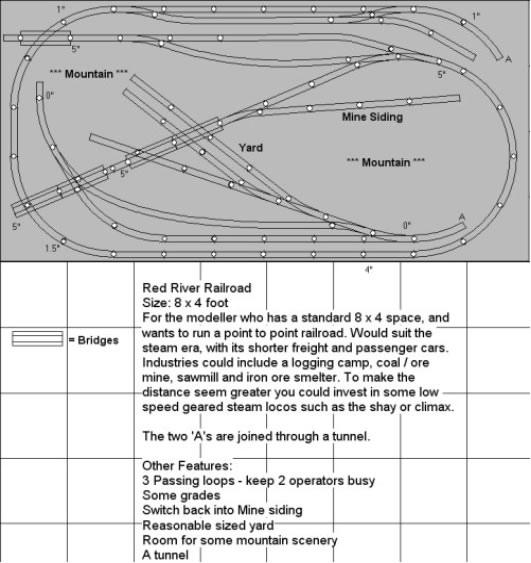
Parts List - Red River RR layout (8x4)
5 Flex track
(Minimum 3ft long)
34 9" Straight
18 Full Section 18" Radius
3 3" Straight
1 1 1/2" Straight
1 1/2 Section 18" Radius
6 Snap-Switch, left
6 Snap-Switch, right
6 Plate Girder Bridge
Olympia
& North Western Railroad Layout (8x4 feet)
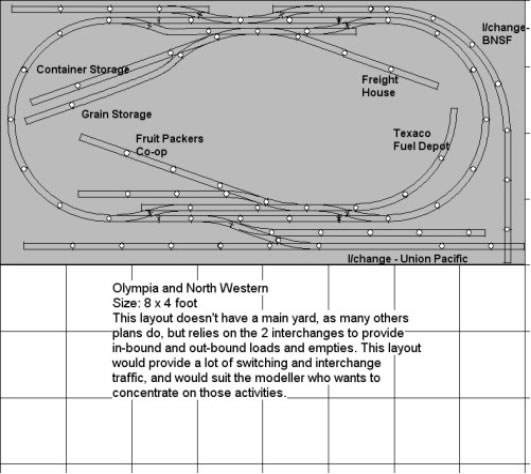
Parts List - Olympia & North Western RR layout (8x4)
2 Flex track
(Minimum 3ft long)
32 9" Straight
15 Full Section 18" Radius
4 22" Radius
1 90° Crossing
2 6" Straight
2 3" Straight
10 Snap-Switch, left
9 Snap-Switch, right
Riverside
Switching Railroad Layout (6x4 feet)
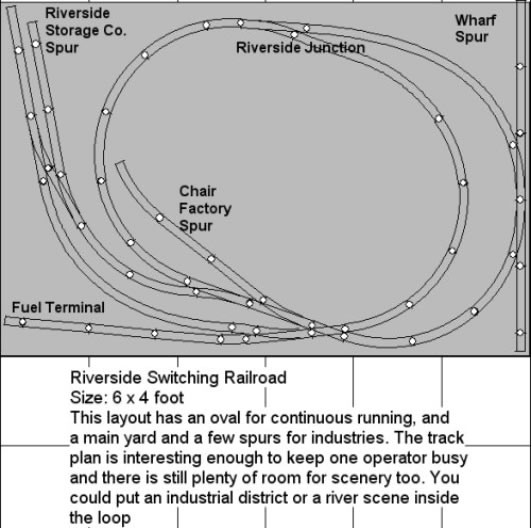
Parts List - Riverside Switching layout (6x4)
3 Flex track
(Minimum 3ft long)
11 9" Straight
15 Full Section 18" Radius
1 25° Crossing
1 6" Straight
1 3" Straight
1 1/2 Section 18" Radius
2 1/3 18" Radius
2 2 1/2" Straight
5 Snap-Switch, right
3 Snap-Switch, left
Return
to top of page
British
Columbia & Rock Mountain Railroad Layout (6x4 feet)
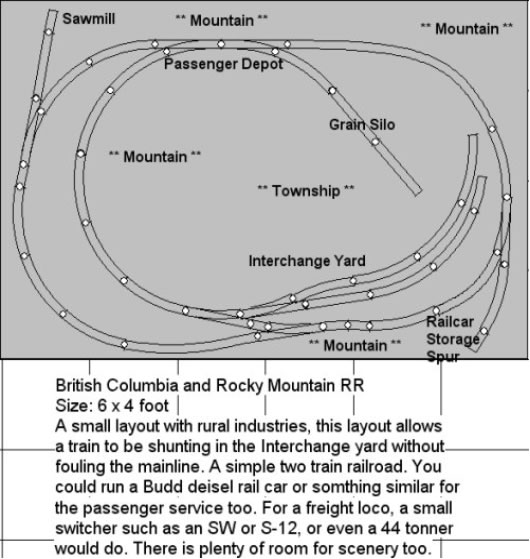
Parts List - British Columbia & Rocky Mountain RR (6x4)
2 Flex track
(Minimum 3ft long)
4 9" Straight
19 Full Section 18" Radius
1 22" Radius
4 3" Straight
1 1/2 Section 18" Radius
1 1/3 18" Radius
1 2 1/2" Straight
4 Snap-Switch, right
3 Snap-Switch, left
A
Double Track Railroad Layout
Parts List - A Double Track Railroad layout
3 Flex track
(Minimum 3ft long)
11 9" Straight
30 Full Section 18" Radius
1 30° Crossing
3 6" Straight
2 3" Straight
7 Snap-Switch, left
5 Snap-Switch, right
Multi-Level
& Western Railroad Layout (6x4 feet)
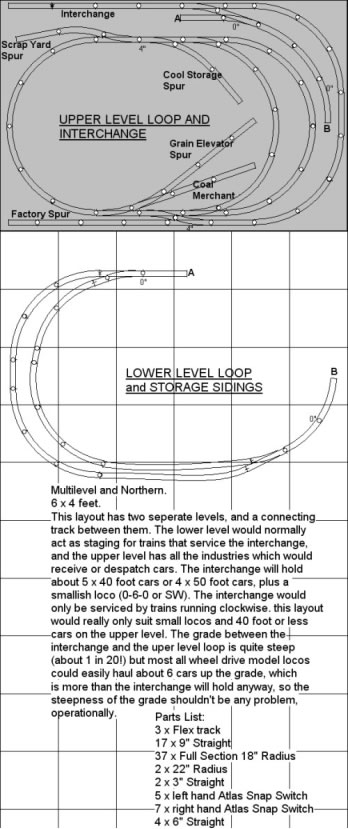
Multi Level & Western RR layout (6x4)
3 Flex track
(Minimum 3ft long)
17 9" Straight
37 Full Section 18" Radius
2 22" Radius
4 6" Straight
2 3" Straight
5 Snap-Switch, left
7 Snap-Switch, right
Return
to top of page
South
Eastern Railroad Layout (8x5 feet)
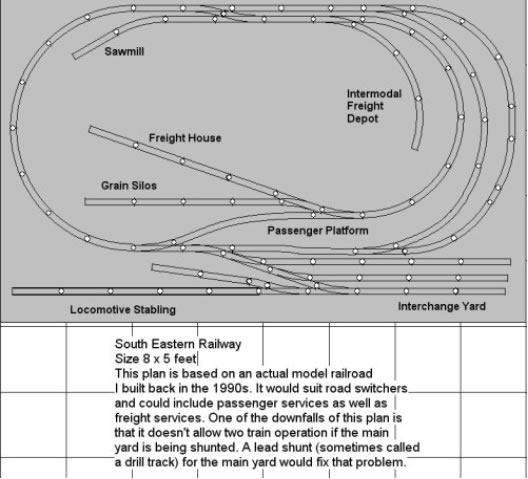
2 Flex
track (Minimum 3ft long)
28 9" Straight
16 Full Section 18" Radius
12 22" Radius
2 6" Straight
1 3" Straight
1 1/3 18" Radius
8 Snap-Switch, right
5 Snap-Switch, left
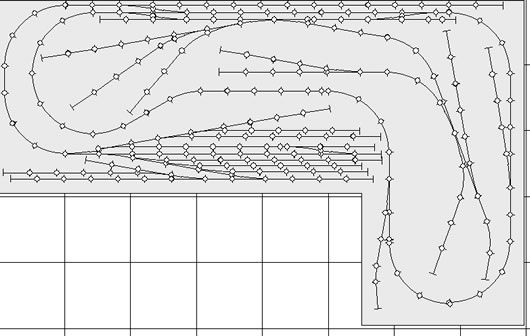
Central
Metro Terminal RR (10x6 feet)

A switching layout in a spare room or in the corner of a garage. This plan presents a number of interesting shunting movements to the operator, and is best suited to those who prefer lots of operating action rather than simply watching trains! There are switchbacks, facing and trailing turnouts. The industries are varied enough that you can have a large variety of rollingstock. There is only one ‘runaround’ track, which means you would need to plan your train movements, somewhat like playing chess. You can even wire it for more than one operator, or use DCC to have more than 1 operator.
Track is color coded
as follows:
Red = 18 inch radius full section track
Green = 18 inch 1/2 or 1/3 length curve track
Pink = Flex Track
All turnouts are the same geometry
This plan is designed to be non-manufacturer specific as many modellers have a particular brand they prefer. Because of this the plan may require some slight adjustment depending on the brand of track you wish to use.
Parts List - Central Metro Terminal RR (10x6 feet) 3 Flex
track
56 9" Straight
10 Full Section 18" Radius
2 19° Crossing
4 6" Straight
7 3" Straight
1 1 1/2" Straight
1 1/2 Section 18" Radius
2 1/3 18" Radius
10 Snap-Switch or similar, left
7 Snap-Switch or similar, right
Modifying this plan
to suit your available space is quite easy. Simply add length on
either end, either as mainline or with extra industries. You could
also make this layout part of an around the wall type of layout
with a continous run.
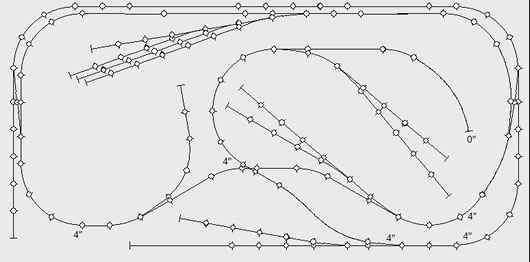
Onion Pacific RR (10x5
feet)
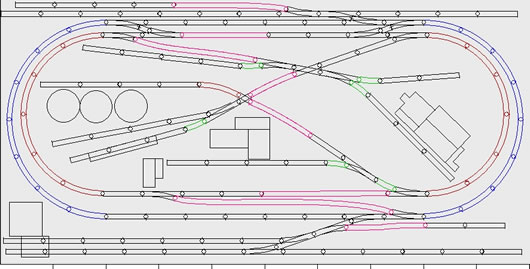
This layout plan is similar to one I designed for a friend of mine to give him some ideas for his own model railroad. He wanted a double track mainline for multiple train operation, with plenty of industries to shunt. One of the advantages of this type of plan is the ability to have a train running on the mainline, while a local freight is run or switching is carried out on other parts of the layout. The track plan also features crossovers to allow trains to change tracks, something that is very important for more interesting operation.
Track is color coded as follows:
Blue = 22 inch radius full length curve track
Red = 18 inch radius full length curve track
Green = 18 inch radius 1/2 curve track
Pink = Flexitrack
Turnouts are all the same geometry.
This plan is designed to be non-manufacturer specific as many modellers have a particular brand they prefer. Because of this the plan may require some slight adjustment depending on the brand of track you wish to use.
Parts List - Onion Pacific RR (10x5 feet) 6 Flex
track
79 9" Straight
13 Full Section 18" Radius
16 22" Radius
1 60° Crossing
6 1/2 Section 18" Radius
1 30° Snap Crossing
2 2 1/2" Straight
7 Snap-Switch or similar, left
13 Snap-Switch or similar, right
If you
require wider radius turnouts, you may need to move some spurs,
or leave them out altogether if you need to keep the layout the
same size. Also, if you consider 18 inch radius to be too sharp,
you may have to leave out some of the yards at the top and bottom
of the plan in order to accommodate larger radius curves. If you
have the extra space to make the layout longer and wider, you could
simply expand the layout size, having wider radius turnouts and
curves, but having the basic plan remain the same. Another way to
make the layout more realistic would be to have some gentle curves
where the mainline is straight - you would need to buy more flexitrack
and less standard straight sections to accomplish this.
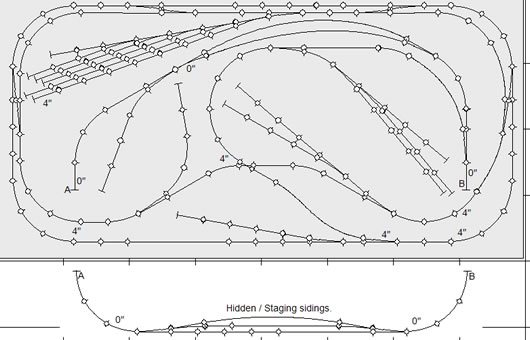
Unfinished and Eastern (8x4
feet)
Stage 1: Above
This plan is designed to fit a standard 8x4 feet plywood sheet.
It features a single track mainline, with a good sized yard, and
plenty of spurs to shunt. Take special note of the heights indicated.
If you plan to build stage 2, setting these heights in stage 1 will
help you build stage 2.
Stage
1:
6 flex track (Minimum 3 foot length each)
70 5" Straight
32 Full Section 11" Radius
1 30° Crossing
9 #6 Turnout Manual Left
6 #6 Turnout Manual Right
Stage 2: Below
The plan is still designed to fit a standard 8x4 feet
plywood sheet. But now it also features an expanded yard, a branch
line with a turnaround track and more spurs to shunt, a double track
mainline, and better access to the yard for easier shunting.
4 flex track (Minimum 3 foot length each)
24 5" Straight
14 Full Section 11" Radius
9 #6 Turnout Manual Left
6 #6 Turnout Manual Right
Setrack Lines (8x5 feet)
This plan allows for 2 person operation, but does not allow trains to pass on the mainline. There is a place where one operator can shunt the numerous industries at the top of the plan, and a large yard at the bottom of the plan for the other operator to shunt. Each operator could take turns running a train on the mainline, and can shunt when not running on the mainline. There is also an industrial branch on the right hand side of the plan for added interest. This plan uses NO FLEXITRACK! So if you are new to Flextrack and don’t feel confident using it, this plan could be for you. It uses all standard curved 11" radius and straight pieces and #6 turnouts.
Scenery would be best suited to an industial district in a large city, but if you leave out a few of the industry spurs and have industries such as coal mines, timber millls, and the like, instead of city based industries, you could make it a rural or mountain setting.
Parts List - Setrack Lines (8x5 feet) 5 2½"
Straight
3 1¼" Straight
1 5/8" Straight
156 5" Straight
33 Full Section 11" Radius
2 Half Section 11" Radius
12 #6 Turnout Manual Left
17 #6 Turnout Manual Right
This plan is designed
to be non-manufacturer specific as many modellers have a particular
brand they prefer. Because of this the plan may require some slight
adjustment depending on the brand of track you wish to use.
Return
to top of page
'O' usatonic RR (17x9
feet)
This O scale plan takes up a large space, but the large space is broken up by having an Operating Pit in the centre. The plan features a double track mainline, with a passing loop on the outer loop, and some decent sized spurs which could have some interesting industries on them. There is also a reasonable sized yard for making up trains.
Parts List - 'O' usatonic RR (17x9 feet)
6 Flex
track
27 40.5" Radius Full Curve
16 45" Radius Full Curve
8 #7.5 Left Hand Turnout
7 #7.5 Right Hand Turnout
60 10" Straight
1 Wye Turnout
This plan is designed
to be non-manufacturer specific as many modellers have a particular
brand they prefer. Because of this the plan may require some slight
adjustment depending on the brand of track you wish to use.
'O' Scale Shunting RR (12x6
feet)
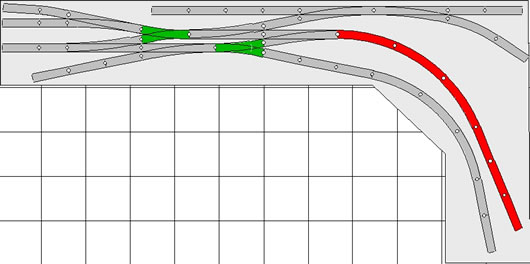
This O scale plan is almost as small as you can get in O scale and still have lots of operating potential. There are 7 places to shunt, a small turnaround track, and the interchange. The Red track to the right is the interchange track. If you have more space you could extend this further, and maybe add a second shunting area. The two green colored turnouts are Wye Turnouts - these help save a little space. All other turnouts are #5's. Even though this plan is compact, there is still some space for scenery. You could use buildings at the front to provide scenic breaks, and building flats at the back to provide industries on the spurs. This plan is 2 feet wide in most places, but increasing the width to 2 ½ or 3 feet would also help when it comes to more scenery potential.
Parts List - 'O' Scale Shunting RR (12x6 feet)
1 flex
track
3 40.5" Radius Full Curve
6 #5 Left Hand Turnout
1 #5 Right Hand Turnout
22 10" Straight
4 36" Radius Full Curve
2 Wye Turnout
This plan is designed
to be non-manufacturer specific as many modellers have a particular
brand they prefer. Because of this the plan may require some slight
adjustment depending on the brand of track you wish to use.
Return
to top of page
© 2006 Robert
Anderson, Market Leaders Ebooks, all
rights reserved