Cover
All Aboard!
Start With The Basics
Why The Track Is So Important
How Does The Power Supply Work?
Analog
and DCC Explained
Layout Options Explained
Locomotives And Rolling Stock
What Should You Start With?
How Do You Create A Good Layout
More On Layouts and LDE
How to Create Realistic Scenery
Explain Weathering Techniques
How To Repair Problems
BONUS SECTIONS
Frequently Asked Questions
Glossary of Important Terms
Model Railroad Yard Design Explained Step-By-Step
Model Train Layout Track Plans
Garden Railroads
Mastering An Airbrush Step-By-Step
More
Model Railroad Resources
If you only have a small space in which to set up your layout, then you are not alone. There are a lot of people around in apartments and small houses with only limited space at their disposal. In this situation H0 scale (1:87) is a possibility, but the smaller N (1:160) or Z (1:220) scales may be more feasible. When you use a smaller scale or narrow gauge, you'll need less space, or can use the available space to achieve smoother curves and switches. Many enthusiasts that have small layouts use sectional tracks, because they find it easier than bending flexible track to a smooth but narrow curve.
What Are The Limitations Of A Small Layout?
When you plan a small layout, it's important that you know the limitations the small space imposes on you. Although the space you have available might limit your choice of scales, the major limitation is usually in the choice of themes you can model. In most cases main line themes wouldn't fit.
Whereas, given that you only have a limited space available, industrial, branch line and tramway themes are possibly the best options to consider. If you must have a mainline theme, but don't have space for it, then you'll probably have to scale it down.
If don't want to compromise, then don't start a small layout. There are a number of differences that you will need to accept or adapt yourself to: the curves may be too sharp, the angles of the switches may be too steep, and the sidings too short. With a small layout everything is compressed to the max. But when you think about it, although a small layout may not be your first choice, it is better than no train set at all!
Can You Adapt A Small Or Large Scale Layout?
It's not just people with a limited space who build small layouts. Most railroaders who want to build a large-scale layout, soon discover that their large space is smaller than they thought. Some people say that for a small layout you can use elements from larger size layouts. In theory there is some truth in that, but when you think about it, some large size layout themes cannot realistically be used for their small size variants. On the other hand, using small layout designs for large size layouts usually works. This is because; you can simply blow-up the designs to achieve a more realistic layout with smoother curves and switches, longer tracks for more cars and create possibilities for more realistic scenery.
Interesting
Fact: When visiting California the Golden State Model Railroad Museum is well worth seeing. The museum has 10,000 square feet of O scale, HO scale and N scale model railroading. Inside the Golden State Model Railroad Museum, you will find three large model railroads, constructed and operated by the East Bay Model Engineers Society (EBMES). The museum is located in Point Richmond, California (just north of San Francisco, at the north end of the East Bay). |
Why
Is LDE Important?
The "Layout Design Element"
can help you do a better job of designing part or all of a model railroad,
because you are focusing on just one element of the full-sized railroad
at a time. By doing this, you will get to know how the real thing looks
and operates, before you begin construction of your scaled-down model.
7 Steps To Make LDE Work Best For You
Running just anything on a model railway with scenery that was just thrown together because it looked nice is nothing like duplicating the real thing with LDE.
1. Choose Your Prototype
Choosing a prototype, whether a specific station on a specific day or just a general region over a period of years, gives you a purpose for everything on your model railway.
You could model your prototype from a section of full-sized railroad that is currently operating, or you may have a favorite period in railway history that you could select from. The first thing that you need to do in choosing a prototype is to choose the location. First select the state, country, or continent to base your model railway on. The locality can then be further refined as far as is necessary. You may want to focus on a particular company or group of companies to define the location of the layout more closely. The availability of ready to run models and kits for the various localities in your chosen scale will probably influence your choice.
For instance; if you are modeling North American and choose the DRGW then you perhaps decide that the layout is based somewhere near Denver. Choosing GWR places your location somewhere in the south west of England perhaps in Devon.
For these examples you make a different decision as to precisely how the layout is being located. Each has defined a locality, so with attention to detail you could recreate a far more realistic model than could otherwise have been produced.
The next thing to choose about your prototype is the time period. This will already have been decided to some extent by your choice of Railway Company, because the company may have only existed between or after a particular date.
| Research
is needed to get accurate details. A bit of detective work on your
part is required to gather this information from magazines, books,
watching DVD's, surfing the net, visiting museums, talking with
fellow railroaders, and even attending historical society gatherings.
It can all help to piece the jigsaw together. And, researching your
prototype can almost become a hobby itself as you strive to learn
all about it. |
 |
| Quick
Tip: While reading about your chosen prototype you will also find information regarding train formations. Which locomotives pull what trains? Which wagons run directly behind the locomotive? This information is also useful because it will help you to better decide on how you will assemble your trains for greater realism. By doing this research early, you'll get an indication of what rolling stock is needed and you'll then be able to research if it is readily available or not. |
2. Accurately Define The Layout Space
Make accurate measurements in all three dimensions. Define the layout space and be really detailed about what you would like to include. Be sure to allow for all projections into the space, especially overhead objects such as beams, ductwork, and piping that people (you included) could knock their heads on. This is especially important when designing multilevel or mushroom layouts, as these place greater emphasis on using vertical space.
3.Accurately Align Your Straight Tracks With Easements For Curves
Easements help align the straight track (or tangents) with the curves and make it easier for trains to go around curves. They may also help where space is tight, as it's often better to include easements even if this forces you to reduce the curve radius slightly to accommodate them. Easements are also required in vertical curves at the top or bottom of grades.
4. Make Your Layout People-Friendly
Model railroads are always constructed, operated, and maintained by people. It is therefore important that you plan your railroad in a way that it makes it easy for you to maintain and operate. You'll get more enjoyment out running, or working on a layout, if everything is within easy reach. 24-30” is about the realistic limit for most people to reach and manipulate objects with ease.
When people need to lean over a layout cars on tracks near the front of the layout can get knocked over and scenery can get damaged. If you must have tracks that extend past 30” deep, make sure the turnouts leading to them are in reach, since that’s where most problems happen.
For maintenance purposes you'll need easy access to the layout. You will want to make sure that you can get around easily and handle any needed repairs. You can be absolutely certain that the most difficult section of track-work to reach will be the toughest to build and always cause you the most grief.
Interesting
Fact: The Greater Midcontinent Railroad Company was founded in 1991. The HO scale model train set layout occupies approximately 20 by 30 feet of the basement of the Garrett Historical Society Museum, Indiana, USA. The model train layout has about 7 scale miles of track, which typically takes 20 minutes for trains to complete a circuit. |
5. Use Templates For Drawing Turnouts
Using software templates will help the progress run more smoothly. Making mistakes is easy when estimating the length of track required, or the angles of turnouts, especially when trying to do it in your head. Using templates can eliminate the guesswork and subsequent disappointment. You can make your own templates, or you can use computer software.
CAD software enables you to produce quality prints and makes everything easier, for layering, ease of making changes, to 3-D rendering.
| Quick
Tip: If you're using automatic uncoupling then tracks can be closer together. Uncoupling sites can be out of direct view, but uncoupling devices will still require some sort of visual markers. A pole, or a dab of paint on the side of the rail will do the trick. Also, keep in mind that automatic uncoupling requires higher standards for coupler installation and maintenance. |
6. Avoid sharp S-curves
Create straight track
(tangents) of suitable lengths between curves in opposite directions.
This will help you avoid hidden “s curves”. They are the ones
that are created by crossovers between adjacent tracks and turnout arrangements.
By adding an appropriate tangent you’ll prevent reoccurring derailing
accidents that can happen when using longer cars and less flexible "stiff-legged"
steam locomotives. Hidden "s curves" can easily catch you unawares
and become a major problem when you encounter them. Adding easements,
and/or increasing the curve radius do help to avoid these problems.
Quick Tip from model
train hobbyist for 28 years...
“Here's a quick and cheap way to make evergreen trees and shrubbery that is perfect for an N scale layout. Get a green fiber scouring pad. Tear it apart in varying sizes and thicknesses. Paint round toothpicks either dark brown or gray and set aside to dry while you tear up the scouring pad. With a hot glue gun place a dab of glue where you want the lower limbs to start. Then quickly slide a wide piece of torn scouring pad down the trunk and into the hot glue. Add more pieces of scouring pad (getting smaller as you go), by sliding them down the trunk. They will be held in place by the friction of the trunk. The top piece is again set in place with hot glue and shaped into a peak. Trim to shape with scissors and you're finished.”
Jamie M, model train enthusiast for 28 years.
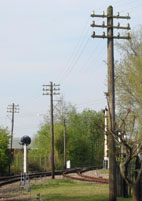
Quick
Tip: Then, at the
next pole simply put a drop of glue on the insulator and position
the line in the adhesive at the base of the insulator. This should
hold it in place so that you can do about 3 - 5 feet in one go.
If you want to create high tension type lines then use a 10lb
line. You may want to experiment with different sizes. Also, don't
forget to run lines to buildings... after all they need electricity
too! |
 |
7. Build With Flexibility In Mind
Circumstances chance, so at some stage in the future you might find yourself moving house. For this reason it is a good idea to design a layout to facilitate moving it. Aim for flexibility, so that the layout can be moved easily, with a minimum of disruption or damage. Consider modular construction. It works well as you can disassemble the sections and put them together again when you relocate to a new location.
Return to top of page
Interesting
Fact: And in Asia... Every day East Rail carries about 800,000 passengers. 48 domestic passenger trains travel into and out of Hung Hom station every hour during the morning peak period. Hong Kong's heavy
rail network is primarily arranged on two axes. Since electrification
in 1983 patronage of the East Rail route has soared almost six-fold.
A fleet of 451 GEC-Alstom-built EMU vehicles share the same tracks
as trains continuing to Shanghai and Beijing, as well as commercially
vital freight, mainly container traffic. |
Another
9 Important Considerations
When Planning Your Layout
1. Think About Your Wiring Requirements
From a planning, safety and reliability point of view it is best to think through your wiring requirements as early as possible in the building process. Most layouts have three main wiring requirements:
- Track power, which includes wiring for switch motors and structure lighting
- Command control bus lines
- Signaling
With most train sets there is always the potential for interference between wires carrying relatively high voltage and current needed to run the trains and those carrying low-voltage control signals. This explains the need to separate them.
Identifying these routes in advance helps prevent interference if electronics such as command control and logic circuitry for signal systems are added at a later stage.
| Quick
Tip: It is true that,
the advent of Digital Command Control systems has helped alleviate
interference problems. In saying that, it is best not to ignore
such concerns by haphazardly group wiring. |
2. Stay In 'Walk-Around' Control
Gone are the days of sitting in a central control pit and watching the trains go around. Now it is all about operation. The engineer needs to be able to follow alongside the train, so 'walk-around' control is an important consideration when building a layout. But even 'walk-around' designs can be compromised when a track cuts through the base of a peninsula, keeping the engineer from following the train.
Command control has made 'walk-around' operation much easier to achieve. Radio and infra-red wireless throttles, which avoid "plug-and-chug" crew movement, are becoming increasingly popular.
3. Be Comfortable
Don't skimp on comfort because you'll probably spend a lot of time at your layout. Any operating session can easily run for 2-4 hours or even longer, so comfort is important. Standing for long periods on concrete floors is not desirable so consider carpeting where possible. If your feet get really tired try some pliable rubber matting. And not forgetting the off-duty crews that will need a comfortable crew lounge so they can rest in comfort and prepare for the next shift.
Quick
Tip: To
get the best from your layout:
|
4. Railroads Don't Operate In Isolation
Very few model railroads depict an isolated part of a countrywide or statewide rail network. Most railroads connect end-to-end or cross. So, depending on your layout, you may need to allow for moving traffic between your railroad and one or more railroads.
5. Railroads Need Interchanges
Where railroads cross, interchange tracks are usually constructed. This is so that cars can be delivered and received from each other. Interchange tracks offer more traffic variety, because almost any type and number of cars can be found there. An interchange track is often a quarter circle (more or less) in one quadrant of the level crossing.
To simulate the work of
railroading you'll want to operate a car-forwarding system. Having a car-card-and-waybill
system is for efficiency in forwarding cars to their proper destinations.
Return
to top of page
6. Think About Your Traffic Control
Small layouts can get by without a dispatcher and/or train-order operators, but these are typically the most challenging and realistic jobs on any railroad. This is especially so, now that timetable and train order operation is becoming more popular.
7. Include Lots Of Switching
Industrial switching and yard work can present a lot of interesting challenges for modelers. That's why most modelers enjoy a lot of switching. So, unless you prefer hauling heavy freight trains up steep grades, you might want to consider building in lots of yard and local work…and incorporating lots of switching.
8.
Add Large Industries Large industries can add enormously to a layout because of the workload they generate. Smaller industries aren't usually as busy, and more than likely won't even fill one semi-trailer a week, let alone several boxcars or covered hoppers per day. For this reason it can be more interesting to model one large industry that can generate a lot of rail traffic using a variety of rolling stock. For instance: a brewery, steel mill, lumber yard, or a paper mill. |
 |
9. Add Sound
Sound was at one time considered a novelty for modelers, but now thanks to technology, the possibilities are endless. Digital Command Control (DCC) sound allows for phenomenal realism. Operators can now use whistle or horn signals to support operations such as sending out a flag or alerting a train being met or passed that another section is following.
Notice that the center track in the yard is not parallel to the others. This is because the turnout used for the middle track is a #6 turnout while all the others in the
 |
 |
 |
Another thing that can help you to lay flexible track is measuring the distance between tracks at regular intervals, say every foot or so, to check that the tracks are the same distance apart.
Below are some hints to help you lay parallel track either in yards or on the mainline.- Measure the distance between tracks at regular intervals to make sure they are the same distance apart. If using non-flexible track, you need only measure the distance between tracks at the end of the piece you are laying to check that they are parallel. If you are using flexible track, you should measure the distance between tracks about every foot for straight tracks, and more often on curved track, to ensure the tracks are parallel.
- You could make a small piece of scrap wood into a device for keeping tracks parallel that should be parallel by simply placing the scrap piece of wood between each piece of track to make sure they are the distance apart that you want them before you fasten the track to the baseboard.
- Use turnouts from the same manufacturer, and with the same track geometry (eg, all #4's, or all #6's, etc), when laying track in a yard, or when using two turnouts in a crossover to join two parallel tracks. The types of rolling stock you plan to use will affect your choice of which type of turnouts to use – longer rollingstock and locomotives generally require higher numbered turnouts.
- If you are new to the hobby of model railroading you might want to consider using one of the brands of non-flexible track for any parallel track on your first layout. There are a number of brands available, either with or without molded plastic trackbed which you can choose from. If you use track with molded trackbed, you won't have to ballast your track either!
Click
The Link Below To View The |
Quick
Tip: |
Interesting
Fact: This train journey from Sydney (on the East Coast) to Perth (on the West Coast) covers 4352kms. The Indian Pacific Train travels from the spectacular Blue Mountains to the treeless plains of The Nullarbor, where the train travels the world’s longest straight stretch of railway track (478 kilometers). Passengers experience three nights aboard the train as well as scheduled stops at Broken Hill, Adelaide and gold rich Kalgoorlie. A remote outpost on the Nullarbor Plain called Cook, population 2, presents a further opportunity to stretch your legs. The Indian Pacific passenger train first ran in February 1970 from Sydney Central to East Perth linked New South Wales, Victoria, South Australia and Western Australia but by-passed Adelaide, the capital of South Australia. The Adelaide rail terminal (with standard gauge connection) was opened in May 1984. |
Return
to top of page
© 2006 Robert
Anderson, Market Leaders Ebooks, all
rights reserved