Cover
All Aboard!
Start With The Basics
Why The Track Is So Important
How Does The Power Supply Work?
Analog
and DCC Explained
Layout Options Explained
Locomotives And Rolling Stock
What Should You Start With?
How Do You Create A Good Layout
More On Layouts and LDE
How to Create Realistic Scenery
Explain Weathering Techniques
How To Repair Problems
BONUS SECTIONS
Frequently Asked Questions
Glossary of Important Terms
Model Railroad Yard Design Explained Step-By-Step
Model Train Layout Track Plans
Garden Railroads
Mastering An Airbrush Step-By-Step
More
Model Railroad Resources
Throughout this ebook I give you several tips on weathering, which is basically the art of taking something new and making it look like something old. It could be locomotive, caboose, a building, a bridge, a tunnel, a road, a fence, or any element of scenery for that matter. Almost anything ages and changes over time.
 |
For example;
when you buy a some rolling stock it comes packaged all shiny, plastic
and new. It probably looks too perfect, unreal and out of place alongside
the other cars on the track. It may need "roughing up" to make
it look used, or at least show some signs of wear and tear.
It really comes down to deciding if want to "rough-up" the factory
paint job on the very expensive rolling stock you've just purchased. But,
like it or not, shiny new cars usually look out of place on an otherwise
"used looking" layout.
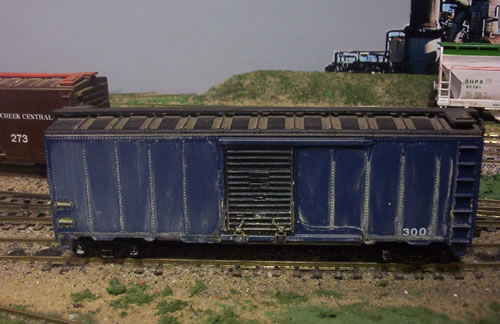
In reality; most cars on a railroad show varying degrees of rust, grime
(lube and oil), mud, soot, denting, scratches and some are even covered
in graffiti. However, cars do vary in age and usage, so they shouldn't
necessarily all look the same. And, not everything is dirty, because the
contact on bare metal can keep some areas clean.
 |
So, it is
a case of thinking carefully about the age and likely wear and tear that
you want to mimic... and whether you are prepared to "rough-up"
your rolling stock for the sake of adding realism.
Also, think about the region or era you are recreating. Is it likely to
be muddy at times or would it be more dusty and arid like in a desert?
For example, the rolling stock might need a sun-bleached look, which can
be achieved with dullcoat brushed over with some rubbing alcohol. This
will give the model a kind of a white milky haze. If you don't like it,
respray with dullcoat. However, always test techniques on something else
before you try them out on your prized models, because you may not like
the effect.
Here are some weathering techniques to get you started.
Pastel
Chalks And Pencils:
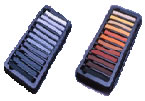 |
Most art or hobby shops sell pastel chalks individually or in sets
of assorted colors. When ground-up, pastel chalks can be ideal for
simulating roof dust, rust, dirt, grime and soot. The chalks can
be scraped with a knife blade or a file onto a piece of paper and
then applied with a stiff brush. |
When you are
happy with the result, you can fix the chalk permanently in place with
a spray coat of Testors Dullcote. The good thing about using chalk, is
that it's not permanent until it is sealed in place. If you are not happy
with the result, or you make a mistake, you can simply wash the chalk
off (as long as you haven't sprayed it).
Colored pencils can be used to add streaks and marks around rivets. A
common graphite pencil can be used to leave graphite marks that look like
steel, or exposed bare metal, or to simulate worn metal on steps and rungs.
Dry
Brushing:
Dry brushing is when you use a nearly dry brush to simulate rust and grime.
The trick to getting a nearly dry brush, is to dip the brush in paint,
and then wipe it off on a paper towel or sponge. Dry-brushing causes the
leftover paint to cling to all the high spots on the model, highlighting
the detail. Dry-brushing can make the weathering look less one-dimensional.
Dry-brushing is also a good technique for highlighting truck detail, walkways
and ladders. Floquil Polly Scale Reefer Gray is a good color choice for
highlighting details like lines of rivets etc.
Bounce-Weathering:
This is when paint is sprayed from an airbrush, or aerosol can, onto a
piece of cardboard at an angle. With a bit of trial and error, the paint
bounces off the cardboard onto the model in nearly dry specks.
Bounce-weathering can simulate the various types of grime and dust that
flicks up onto cars and locomotives.
Acrylic
Wash With Airbrushing:
When it comes to weathering, using acrylic paint is generally better than
using oil-based paints. Acrylic paints don't leave an oily sheen and can
be easily removed if the effect is not what you want.
Acrylic paints mix well together and can be thinned with water or straight
from the tube. They can be thinned right down and applied with a soft
brush as an acrylic wash (just like a water color artist uses them). It
is usually easier to add move color rather than apply too much and then
try and remove it.
Acrylic washes can be very effective for creating subtle color variations,
rust marks, fading, and all kinds of streaks and grim spots. Natural colors
like raw sienna, burnt sienna, raw umber and burnt umber are choices to
start with.
After applying an acrylic wash and letting it dry, it is usually worth
over-spraying with an airbrush to add to the effect. Floquil Polly Scale
Dirt is ideal for this purpose, because it can easily be brushed or airbrushed
without obscuring surface details. Airbrushing alone can sometimes be
too uniform in color and coverage, so a mix of acrylic wash and airbrushing
solves that problem.
Other colors worth using include: Polly Scale Concrete, Rust, Grimy Black,
Mud, New Gravel Gray and Railroad Tie Brown.
Some cars
need an oxidized look (with the rust and grime) which can be achieved
using Rustall liquid. Start with a base wash of diluted acrylic burnt
sienna paint to get rid of the sheen.
Then apply some pastel chalk, followed by Rustall liquid to give an oxidized
look, and finally a couple of coats of Rustall black wash. If it looks
too oxidized, you can lightly spray on some more Dullcoat to have the
oxidization effect fade away.
Ink
& Alcohol Wash:
Drawing inks can be a useful tool in weathering process. Ink washes work
well on buildings and wooden rolling stock where the wash acts like a
wood stain (to age the wood) and also penetrates the groves between each
board.
For weathering decks try using a mix of 70% isopropyl alcohol with a few
drops of india ink added. This mixture can be wiped on with a rag to simulate
a weathered worn deck.
Inks can bring out details in plastic or metal, they can be used to add
mortar lines to plastic brick buildings, used to stain plaster. Also,
use inks to simulate fuels spills on tank cars and locomotives, as well
as shading the insides of coal cars.
When using an ink/alcohol wash on rolling stock the ink tends to seep
into any cracks, crevices, or seams and around the molded details, adding
to the realism. Use a black ink on darker colored rolling stock and brown
ink on a lighter colored cars.
Let the ink wash dry before spraying with Dullcote. You can then touch
it up with pastels/colored pencils and spray again with Dullcote. To get
a whitish glazing effect you can add more alcohol washes over the Dullcote.
Weathering
Wood Cars:
Weathering in-service wood cars isn't all that different from weathering
steel cars. You need to tone down the shine, add a layer of general grime,
add weathering to he roof, and add detail highlighting. Keep in mind the
era you are mimicking, remembering that the cars might have been almost
new at time your railroad was operating.
Some cars should be new and shiny, some should be due for a repaint and
the bulk would be in various stages of wear and tear.
To weather a wood model, you want to make it look like the paint is coming
off. That's what weathered wood does. Start with a thinned acrylic wash
then dry-brush a silverish gray where you want to simulate lost paint.
Weathering
Wheels & Couplers:
Something you probably should consider is weathering the wheels, couplers
and truck side frames. Even brand new wheels have a coating of rust.
Buy some unscented hairspray in a pump-action bottle. Then you just screw
off the top and pour a small amount into a bottle cap. Apply it using
a throw-away brush and add some weathering powders to get you a textured
rust effect on the wheel fronts (and backs). A slightly lighter application
can be used on the couplers. Then check for free-play after it dries.
Adding
Dents:
At some time or another we've all stopped at a rail crossing and watched
a train go past and probably noticed varying degrees of denting on the
cars.
Replicating dents on a model train can add to the realism, but be warned,
this is not easy to do and there the risk of causing unintended damage
to the cars.
If you are going give it a go, start by removing the trucks and couplers
from an of an ore car, old gondola, or steel boxcar. Remember, the idea
is to give the impression that the car has been dented by cargo falling
against the inside wall of the car.
This effect can be achieved by using heat to deform the plastic outwards
to simulate denting from the inside. Again, I warn that this can be tricky
and the result is not always as planned. So, be warned, you might want
to try out on an old piece of plastic before working on an expensive car.
Use a soldering iron (not set too hot) to gently press against the inside
of the walls. You could also use a heated screwdriver, but again you need
to take care and don't break right through the plastic.
Adding
Scratches:
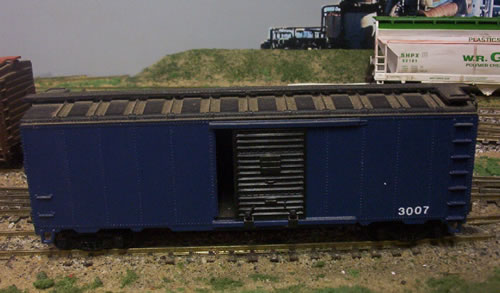
Use a hobby knife to scratch horizontally along the sides where car doors
slide back and forth. You can also scrape off bits of paint to represent
flaking.
Changing
Numbers:
One of the problems with buying duplicate cars from the same manufacturer
is that the numbers on the cars can be all the same. Although it might
seem like a minor point to an untrained eye, it is a detail that can detract
from the realism you are trying to create.
There are ways around the problem. One option is to alter or remove a
car number by gently scraping or sanding away a digit. Another method
would be to alter one of the numbers with matching black or white paint
(maybe a 3 could become an 8 or visa versa). You might also choose to
completely remove the existing numbers and start again using dry transfers
or decals.
Remember though, that the numbers should show varying levels of normal
wear and tear and shouldn't look too clean and tidy. Some numbers could
be partly obscured by grime, soot and even show signs of flaking.
Weathering is an art and usually involves some experimentation to get
the desired effect. The big thing is DON'T OVERDO IT!
Once you get it down, the hardest part of weathering is knowing when to
stop. Less is better until you get the hang of it. And remember, get photographs
of real weathered railroad cars from magazines and books to use as references.
Quick
Tip: |
Quick
Tip: For instance, forklift operators will sometimes use their forks to open or close the box car door, thus creating big scrapes along the sides of the doors. Simply determine where your gash, scrape or dent is likely to be located. Then, with a fine tip brush, apply rust color paint in a downward motion from your gash, scrape or dent. For best results you may need several shades of rust color and you may need to apply several strokes. Pitted rust or
smaller marks can be the result of kids throwing rocks at a passing
box car. With care you can simulate those effects by stippling
tiny marks on the car using your fine tip brush and rust color
paints. Be careful not to overdo the effects. The more random,
the more real. |
Return
to top of page
© 2006 Robert
Anderson, Market Leaders Ebooks, all
rights reserved