Cover
All Aboard!
Start With The Basics
Why The Track Is So Important
How Does The Power Supply Work?
Analog
and DCC Explained
Layout Options Explained
Locomotives And Rolling Stock
What Should You Start With?
How Do You Create A Good Layout
More On Layouts and LDE
How to Create Realistic Scenery
Explain Weathering Techniques
How To Repair Problems
BONUS SECTIONS
Frequently Asked Questions
Glossary of Important Terms
Model Railroad Yard Design Explained Step-By-Step
Model Train Layout Track Plans
Garden Railroads
Mastering An Airbrush Step-By-Step
More
Model Railroad Resources
In writing this bonus
section we did a lot of research and asked modelers from around the globe
to submit questions that they wanted answered. Here are the answers (in
no particular order) to some of the most frequently asked questions:
Which
rails should I use - brass, steel or nickel-silver?
Nickel-silver rails are a good choice. With nickel-silver rails you will have better running trains. With steel and brass rails the trains can tend to run erratically after a while. Nickel-silver rails also require less cleaning; they provide better electrical conductivity and tend to look more realistic. To work efficiently, brass rails must be kept very clean as the oxide that forms on them creates a barrier to the current. Zinc-coated steel tracks are another option, but the zinc can wear off. This can expose the steel that can then rust. Steel is also more difficult to cut.
How do I keep my layout free from dust and cobwebs?
Dust and dirt, are any model railroad's biggest enemies. The first step to keeping track clean is to eliminate the sources of dust and dirt. Among the best ways to do this is to put your layout in its own room (if possible). To cut down on dust and dirt, finish the walls and ceiling. If your layout is in a basement or attic, consider installing a suspended ceiling in the entire room or just over the layout to reduce the amount of dust and dirt that gets on the rails and scenery.
A vacuum with a slit end works well for cleaning away dust. To avoid sucking up any parts of your layout try putting a piece of nylon over the end of the vacuum hose. A brush attachment can be used for removing dust from fixed structures. Also, sweep the surrounding area regularly to keep dust down.
Keeping windows closed also helps, as open windows let in a lot of dust and dirt. If possible, it is best to keep your layout and workshop areas separated to reduce contamination. Also, a no smoking rule is a good policy, because cigarette smoke can leave a buildup of grime on the track.
Running trains is the goal – not nudging stalled engines. By cleaning track regularly, you can keep your trains running smoothly. Dirty track is the result of dirt and dust that accumulates on railheads. Also, an oxide forms on both brass and nickel-silver rail over time. The oxide on brass rail inhibits electrical contact, whereas the oxide on nickel-silver rail is conductive. For this reason nickel-silver rail are preferable.
Dirt and dust are less of a problem with pre-molded roadbeds. The roadbeds hold the sections securely together to help prevent dirt from reaching moving parts.
What were different methods used to turn an engine?
Real railroads used three methods of turning engines or trains, wyes, loops and turntables. The turntable was by far the most widely used method for turning an engine. Wyes were also widely used for turning engines, or even whole trains, as they were more space efficient than loops. Loops are still are used in some instances but there are relatively few examples of loops in prototype practice.
In model railroading the opposite seems to be true. Reversing loops are the most common as they allow "continuous" running. Wyes are also a common feature with model railroads and turntables are less common. Each of these methods requires some special power routing to prevent short circuits, which are a consideration with any reversing scheme.
How do I figure grades, and how steep can they be?
Expressed as a percentage,
grades indicate how steeply tracks climb. A 2 percent grade means a rise
of two units for every 100 units of travel (or simply a rise of 2 inches
for 100 inches). Even at that this small rise, a locomotive loses roughly
half its pulling power. Each additional percent increase reduces the pulling
power of a locomotive consist pulling power by half again. The key to
determining how steep to make a grade is to decide how many cars you plan
to pull and what's practical in the available space. Realistically, anything
greater than 5 percent is asking too much from your models.
Prototype
Grades Explained:
On a prototype
railroad the base is 100 foot, so a 1% grade represents a 1ft elevation
change in 100ft of travel.
Light Grade = 1% or
less
Heavy Grade = 1% to 1.8%
Mountain Grade = 1.8% or more
Cresting Grade = A long ascending Grade that changes with enough magnitude
to require a change in train handling procedures.
What radius is the curve of prototype trackage?
The prototype doesn't actually measure their curved trackage in terms of radius. They measure it in "degrees", meaning how far the track has to bend off the tangent.
What do the letters stand for when referring to “scales”
The letters can be confusing so a brief summary of what some of them stand for:
- HO stands for “Half O” although it isn’t exactly half the size of O.
- TT stands for Table Top and is smaller than HO
- G is said to stand for "garden" because that is where most of these trains operate. Others claim it was picked because most of the good letters were already taken.
- Z doesn’t stand for anything; it is the smallest commercially available size.
Yes, oil locomotives, but not usually freight and passenger cars.
In modeling, the primary
purpose of oil is to reduce wear and tear on moving parts, particularly
those subjected to intense friction. Locomotives are under constant stress
to transmit power and will eventually break without proper lubrication
applied to the motor bearings and gears. (It is important to use the correct
lubricants on those parts for maximum performance).
Too much or too little lubrication can
cause damage. Too much lubricant will saturate the wiring, insulating
material and attract a modelers worst enemy - DIRT and DUST! The resulting
effect could shorten the life of your trains electrical components and
adversely affect performance. Most at risk are the motor bearings, commutator
and the brushes.
Damaged to the commutator and brushes can happen when oil reaches the commutator. This is because the electrical current passing between the brush and commutator will vaporize the lubricant and glaze the brush surface. This causes an increase in resistance between commutator and brush, greatly increasing the arching between the brush and commutator. The consequence of a dirty commutator is that higher voltages will be needed to operate the trains.
It is true that freight and passenger cars have friction points too, but they're generally under far less stress than locos. Modern day models reduce friction by using acetal plastic side-frames and needlepoint axles. Oiling is unnecessary, because when the oil becomes dirty and breaks down, it actually increases the friction.
Can I keep any scale model railroads outside?
Yes, within reason. Any railroad that can stay on a floating roadbed does reasonably well. HO trains are too light to stay on floating roadbed (the way LGB trains do), so you must use some type of solid or concrete roadbed, like concrete, that the track can be rigidly fastened to.
If you are planning an outdoor railway, you should paint the track to protect it from weather damage. Also ensure that you clean it regularly to slow down the oxidization process.
When
I buy a track switch, what is meant by
'No. 4 turnout' or 'No. 8 turnout'?
The term 'Turnout' can be a bit confusing. It is the British term for a 'switch'.
Yes, there is an important difference between a No. 4 and No. 8 turnout. The smaller the number, then the smaller the radius that comes off the switch.
The smaller numbers are ideal for yards or industrial spurs, but not for high speed. So, if you want to run at high speeds or want to cut over from one mainline to another, the higher numbers will suit you best.
| In
railroading terms the turnout usually refers to all the components
that move a train from one track to another including: the 'switch',
point rails, closing rails, frog and guard rails. |
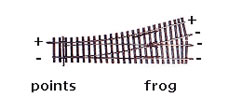 |
Explain the difference between "hot frogs" and "insulated frogs"
Firstly, a couple of quick definitions to clear up any confusion.
A "Frog" is best described as the part of a turnout or a crossing where the rails have an intersection which allows the wheel flanges to cross the running rail (the spot where the deverging rail crosses the straight rail).
A "Hot frog" or "Live Frog" is when electricity is supplied to the frog.
With "Insulated
Frogs" the two rails in the frog are insulated by a thin piece of
plastic.
Hot frogs are are usually best if you plan on running small locomotives
with limited electrical pickup and/or you are using or planning to use
DCC.
Using a hot frog it becomes necessary to change the polarity of the frog when the points are thrown. Doing this is no problem when using an automatic switch machine (with two sets of contacts).
Another option is to use a small switch to change the polarity of the frog. This would require the operator to throw the points and then use an electrical switch to change the polarity of the frog.
Why do my trains short circuit at insulated frogs?
Insulated frogs can mean less electrical problems, but it is possible for cars with metal wheels and the wheel treads of locomotives to briefly bridge the insulation gap and contact both rails at the same time as the train passes through the frog. This can cause a short circuit.
This is not usually as noticeable with Analog layouts because most DC power packs take longer to detect a short circuit and shut down. The train will continue to run because it will usually have passed over - no longer bridging the gap.
Detection and shutdown is usually much faster when a short circuit occurs using DCC power. Factors can depend on the speed of the train and whether or not the locomotive is fitted with flywheels. A fast traveling train (or one with flywheels) could jerk in speed, but continue on past the frog. This pattern will repeat as each wheel set passes the frog. It could also cause erratic speeds for other trains in the same power district.
To avoid constant short circuit problems it is necessary to fix the frog. Here are 3 possible solutions:
1. The most permanent solution is to make the rail V shaped using a Dremel Tool. The appex of the V is on the inside of the rails where the flange contacts the rail.
2. A quick solution (but not permanent) is to apply a thin coating of clear nail polish to the end of the frog where the short occurs. This is only a temporary fix, as the nail polish will gradually wear away as trains pass over.
3. Another answer is to cover the area where the short occurs by gluing a small piece of plastic (or paper) to the frog. When using a small strip of plastic you will need to file the plastic to match the frog perfectly... and you might need to file the frog down a little to allow for the extra thickness of the plastic. It is important that the surface is flat and even.
Should I replace my horn-hook couplers with knuckle couplers?
The two reasons why you might consider replacing your horn-hook (HO) or Rapido-style (N) couplers are for realistic appearance and operation. Manufacturers of magnetic knuckle couplers include: Bachmann, Accurail, InterMountain, McHenry, Kadee, and Micro-Trains.
A talgo truck is a freight or passenger car truck with the coupler mounted on the truck frame instead of on the car-body itself. Truck-mounted couplers are common on train set rolling stock. Advanced railroaders often modify or replace talgo trucks and instead use body-mounted couplers for realism and reliability.
Do some locomotives make less noise?
Why is a locomotive noisy?
I have connected my new train set and the locomotive sits and hums but will not move?
Power supplies usually have four connection screws on the back. These are labeled "AC Accessories" and "Track or Variable DC". Use the "Variable DC" connections to enable your train to move. There are, however, exceptions to using DC for trains... if you have Lionel or Marklin, they operate on controlled AC power with 3 rail track.
If you still can't get the locomotive to go, check that the power is plugged in, the connection to the track is correct and that the two rails do not touch each other, as in a reverse loop, (the outside rail meets the inside rail in a diagonal track connection across an oval circuit)
Should I have a larger motor for my locomotive?
A larger motor tends to be smoother running. In most cases they can withstand more heat and so are less likely to burn out.
If I install a larger motor in my locomotive will I be able to pull more cars?
The weight of a locomotive is the key factor in pulling power. If your locomotive isn't pulling well, and assuming there is space spare inside the shell, you could try filling it with lead. The most effective place to add weight is often above the driving wheels.
How can I prevent motor burnout?
When your locomotive is climbing a grade, or pulling too many cars, the motor has to draw extra current to do the work. If the motor is drawing more current than it can dissipate - it will heat up. If the motor gets too hot, either the motor brushes, or the windings melt.
It pays to monitor how warm your locomotive gets under various loads. You can do this by holding the bottom of the frame to your cheek. If it feels hot enough to cause discomfort, then give your train a rest or lighten the load. Please be careful because you don’t want to burn yourself if the loco is really hot.
A more accurate way, of
monitoring what current your locomotive is drawing, is to install an ameter
and voltmeter to your control panel. They are easy to use and will help
determine the limitations of your engine.
How
many cars will a locomotive pull?
Firstly you need to consider the factors that determine the length of the train you can run on your model railroad layout:
THE DRAWBAR
PULL, or traction, of your locomotive is affected by its weight, contact
with the rail, traction tires, motor and the power available.
This pulling power is measured in pounds and ounces at the rear coupler
or drawbar of your locomotive.
DRAG OF YOUR
CARS depends on the number of axles, lubrication of the bearings and if
there are track pickups on any of the wheels.
The weight of each car is also a factor.
RADIUS OF
THE TRACK CURVES is another factor to consider. The smaller the radius
the more the drag.
A reverse curve, without a straight line between, causes even more drag.
Also remember that a clean track will reduce the drag on curves.
GRADE OF THE
TRACK can be a major factor affecting the pulling power of a locomotive.
Grade is the ratio of distance forward compared to the change in height.
On a model railroad a forward travel of 100 inches with a rise of one
inch is a 1% grade. A rise of two inches is 2%, three inches is 3% and
four inches is 4%. You wouldn't want anything steeper than a 4% otherwise
you could experience all kinds of problems.
(no more than a 2% grade for garden railroads).
So, the number of cars a locomotive can pull will depend on a number of factors.
Mail, express, baggage, newspapers and milk in cans, usually transported in cars nearest the locomotive, are known to railroad staff as "head-end" traffic.
What's wrong when
parts of the track do not work?
How do I go about
fixing it?
You will need to think what you might have done or what might be causing the problem, because there could be any one of a number of things wrong with the wiring. Start by asking yourself questions like: “Was the layout working before the last wire was connected?”
The problem is that single conductor wires may break and are difficult to find. Stranded wire may be shorting at screw terminals if not properly managed. Perhaps one wire is connected to the incorrect rail.
Also, check for obvious loose wires and connections under the layout. Have you ignored a reverse loop? Are you using a new type of turnout?
One option is to disconnect all the feed wires at the control panel and methodically work through every connection, testing its operation as you go. Check the location and polarity of all insulating rail joiners and the associated supply wires.
Locating an electrical
short is not always an easy process. However, it can be done. The best
method, however, is to use a multimeter across each connection to check
the contacts. You'll also need to visually inspect everything.
How can I clean the tracks without causing damage?
Cleaning the track is not usually difficult but it is important. Keeping them clean makes for trouble free running and helps keep debris from your locos wheels and motors, ensuring good electrical pick up and hassle free operating sessions. The thing about cleaning the rails is that you have to make sure that you don’t damage the electrical contact.
Avoid abrasive cleaning blocks. Instead rub the rails with either a pink eraser or using a chemical (or organic) treatment. Rubber erasers can be a bit messy, but they are inexpensive and do a reasonably good job. Chemical methods cost a bit more but can really do a good job of cleaning away the hard debris. Another option is to utilize Goo-Gone, which you'll find in the supermarket, or Wahl Clipper oil, which is often available from beauty supply stores.
How often should the tracks be cleaned?
Running your trains once a day helps keep the rails from getting dirty in the first place. At least run them once a week. Running your trains is fun way to keep the rails clean, and it feels less like work.
What
should I do if my engine sticks when being fed current?
In this case, try cleaning the engine and the tracks as previously mentioned.
On full-sized railroads what is rust-busting?
Sections of track that have not been used for some time (mainly in railway yards) form a thin layer of rust. This can disrupt electrical contact between the train and rails. Rail Traffic Control therefore diverts trains over these stretches of track at certain times. Heavy freight trains are usually perfect for this job, as they clean the rails better than passenger trains.
What is meant by "code," as in code 40 track?
The "code" is simply the rail's height in thousandths of an inch, so code 40 rail is .040 inches high, regardless of the modeling scale it's used in. The term is not used in prototype railroading, where rail size is typically expressed by to by pounds per yard instead of height.
Is a locomotive change-over the same as shunting?
No. Shunting involves splitting up the train into separate wagons or sets. These are then led via an incline to various sidings. They are then combined to form new trains. During shunting, the separate wagons or sets are often led over kilometers of siding lines, a process that can easily take up 1 to 2 hours.
In the change-over of a locomotive (as carried out at frontier stations), only the locomotive is uncoupled from the train and its place is taken by a new locomotive. Once the brake hoses have been reconnected, only a brake test need be carried out before the train is ready for departure. The entire procedure does not take up more than 10 minutes.
Is there an easy way to remove decals without removing the paintwork?
You're probably not expecting this answer, but Formula 409 works well. Simply put a drop on the decal that you want to remove and then wait a few minutes. You can watch as the decal wrinkles up and comes off. If that doesn’t work, then try a decal remover such as Walther's decal remover or Joe's Gel Paint & Decal remover.
Be careful because decal removers can sometimes remove paintwork as well as the decal. So, if you use a decal remover, work quickly and wipe off the decal before it attacks the paint.
What is a green wave for freight trains?
A green wave for rail traffic is similar to that for road traffic. The routes are set up in such a manner that a freight train traveling at a certain speed can continue running, without encountering any red signal lights. This is done because, a heavy freight train can lose a huge amount of energy, and also a great deal of time to stop and start again. This is time in which tracks are unnecessarily occupied, while obstructing other rail traffic. Green waves save time and energy, whilst also enabling improved use of the track capacity.
What wetting agent works best for N scale ballast?
Don't use water and detergent for an N scale, because it won’t penetrate the finer sand used in those layouts. Instead, use alcohol and water for best results.
How do I move my layout without damaging it?
Moving a layout is always going to be a problem unless you build it with flexibility in mind. Open-grid bench-work sections that can usually be moved easily, with a minimum of disruption or damage. With this system you can disassemble the sections and put them together again when you relocate to a new location.
What is a module and is it worth considering?
A module is a sectional layout in with each section only fitting in a specified place. They are great for those who live in apartments, condos or small houses, or for those who move house frequently. Modules are usually 4 to 8 feet long, 24” wide, 40” high with a 8” to 14” sky-board attached to the back. Modules are reasonably inexpensive and don't take long to make.
What's smallest model railroad I can make?
Micro layouts are the smallest and yes, there are enthusiasts who specialize in small layouts. The internet is the best place to get information and make contact. One website with a lot of ideas on micro layouts is http://www.carendt.com.
Is there anything different in wiring for a reverse loop?
Wiring reverse loops often confuses people because the track folds back on itself, and in the process can create a short circuit.
If you are building a reverse loop, you’ll need feeders to the rail every 3 to 6 feet from a common buss. If you have a DCC (Digital Command Control), you could separate your layout into segments for the distribution of power. This could also help with troubleshooting. If you don't do this, and if the whole system shuts down when you have several trains running, you won't know which train is responsible for the short.
What is Hydrocal and what is it used for?
Hydrocal is a trademark product of U. S. Gypsum (USG Corp). Hydrocal is often used for making scenery shells and is incredibly durable. To make a remarkably strong scenery shell dip paper towels in a soupy mix of Hydrocal and apply to a structure of balled paper or interwoven cardboard strips.
Another advantage of Hydrocal is that it picks up detail very well when cast in rubber rock molds. The main disadvantage of Hydrcal is that, unlike softer molding plaster, it is more difficult to carve and detail. Modelers often prefer the softer molding plaster as a topcoat on plaster scenery.
Should I always use track underlay (foam or cork?)
Track underlay definitely reduces the noise levels. Scenery can also act as a noise absorber or noise buffer. If noise is an issue then a combination of foam and cork together will definitely lower the noise levels. Some modelers find the foam quieter than cork. The big advantage of foam over cork is that it can be profiled using a foam-cutting tool.
On a prototype railroad track the ballast is for drainage. The track consists of two rails spiked to wooden ties resting on a bed of ballast. This ballast may be gravel, or any of several kinds of crushed rock, usually limestone or granite. In model railroading, we add the ballast to the track-work for increased realism. Many modelers think this type of track-work is too difficult to build, but it doesn't need to be difficult.
How do I lay and fix ballast on track-work to get a realistic look?
Step one is to decided where the track is to be laid. Using a pencil, draw two parallel lines on the roadbed where the ties should be positioned. Using diluted glue, paint the roadbed in two-foot sections then, lay the ties in place. Set the ties in position the full length of the painted section. Ties are spaced about 3000 to the mile. This converts to about 36 ties per foot in S scale standard gauge. Space the ties a little further apart if using narrow gauge. Ties should be a tie width or less apart on mainlines, and 1-1/2 to 2-1/2 tie widths apart on branch lines.
Quick
Tip: |
With the ties in position, sprinkle on the ballast. A saltshaker or teaspoon can be used. After the glue is dry excess ballast can be brushed or vacuumed away. If you are careful, excess ballast can be used again.
While this section is drying, you can move on to the next section. There will always be spots where the ballast does not adhere, so you can go over any bare spots again. Also, make sure the ballast isn’t above the tops of the ties.
Wait for everything to dry before laying the rails. Lay the turnout first followed by the rail laid to the turnouts. Use needle nose pliers to insert the spike in under the rail, at a slight angle under the rail.
Place the turnout on the ties using the frog as a center guide, positioning it first with the spike down. The stock rails can then be spiked in place. You can use two three-point track gauges to get the rails approximately in place, followed by a NMRA Stands gauge for final spiking. Always check and recheck the gauge with the Standards gauge.
Ground foam just as the name implies: ground up pieces of foam dyed to represent grass, weeds, soil, shrubbery, and tree foliage. The material can be applied with diluted matte medium or white glue. Ground foam can also be applied directly to wet paint. Manufacturers that supply ground foam (or similar products) include: Woodland Scenics and AMSI.
What is Homasote, and why do so many modelers use it?
Homasote is a pressed paper product made by the Homasote Corp. It's recycled newsprint and comes in 4 x 8-foot sheets that are a half-inch thick. It's usually used as wall-insulating material. The main advantage of Homasote is that its density allows it to hold spikes well. Yet Homasote is soft enough that they can be driven in with a pair of needlenose pliers. This is an advantage for those who hand lay their track.
The disadvantage of using Homasote is its poor dimensional stability, as it tends to expand when exposed in humid conditions. One solution seal the product with paint or shellac. Homasote is also difficult to cut without producing a lot of dust and dulling saw blades. One solution is to use a knife-type blade (no teeth) in a saber saw. If you don’t want to use Homasote, other roadbed options include Vinylbed and cork.
What do the three numbers in front of the train stand for?
This is the Whyte Classification System. It is a classification system to describe the different types of steam engines based on the arrangement of their wheels. The first number relates to the number of wheels on the pilot. The second number relates to the number of drive wheels, and the third number relates to the number of wheels on the trailing truck. So 4-4-0 means four pilot wheels, four drive wheels and no trailing truck wheels.
How do I simulate smoke and fire?
There are a couple of ways you can do this.
One idea is to light a flickering 12 volt, 110 amp lamp to simulate flames. You can also add a small fan and some silky material. The material is cut into a tapered shape, similar to the look of a flame. You mount several of them over the fan so it flaps them around, then the light shines up from below. The light flickering on the moving material looks like flames flickering.
If you don't want to use a mini fan, then try just setting up some rapid firing yellow and red LED's to get a flicker. Some careful placement of crumpled aluminum foil with regard to visibility through windows, doorways etc. will give a very realistic flame appearance.
Insulated steel wool makes good smoke. Thin the steel wool out and shape it to look like smoke. Position it coming out of the top windows and the roof in a building. Make sure you have some fire trucks at the scene too to add even more realism to the scene.
How do I depict the aftermath of a fire?
Sometimes it is easier to model the aftermath of the fire. One idea is to show a damaged building with blackened framework. You then add some fire trucks and pumps positioned to dampening down the embers. They can be releasing streams of water made from fiber optics aimed at points where you've embedded the electronic LED lights to simulate hotspots. You can also buy smoke generator kits and smoke generator fluid to use when you have visitors.
Another idea is to include a vehicle for the arson investigators, a police car or two and police patrolling the yellow tapes to keep the onlookers at a safe distance. The flashing lights on all the emergency vehicles would add to the drama. Don't forget to simulate plenty of water in the street gutters as runoff from the fire. Another nice idea is to include a Dalmatian dog investigating the fire hydrants.
How do I make plastic buildings look real?
Here's the trick to make plastic buildings look real. First, paint exterior surfaces with a mixture of hobby paint (flat white, flat gray or flat black) and hobby thinner. Let sit for ten minutes then wipe off. This removes some of the glossly look from the plastic and will "color in" any depressions or marks, bringing out tiles, siding, shingles and bricks. To "mortar" the red brick walls of buildings apply white paint and then wipe it off. Another way to apply mortar is by rubbing the surface vigorously with white chalk, brushing lightly and sealing the chalk dust with matte fixative or clear hairspray. (do this in a well-ventilated space).
Return
to top of page
Why
do some buildings look translucent?
Plastic buildings can become translucent when internally lit. The trick is to get light to shine through the windows, not the walls. The answer is to cut aluminum foil into properly sized panels and glue them to the interior walls. You can use an ordinary glue stick (or Goop). You can do the same for plastic roofs, too. You can even create frosted windows using onionskin paper glued in place. Simply draw curtains, or blinds, on the onionskin for added detail.
Do I have to solder the track?
Soldering track has two advantages: it allows for better electrical conductivity and reinforces rail joints to stand up to stresses such as wood expansion, layout moving, and rail shifting. The trick to good soldering is to start with a clean surface. Use a non-acid core solder and a liquid resin flux, and use a hot iron to avoid melting the plastic ties. Don't add too much solder; a little soldering at the joint is all you need.
Should
electric feed wires be included every
couple of feet or should I solder rail joiners?
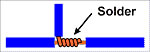
To ensure proper electrical continuity, all DCC connections should
be soldered. At rail level, feeders are directly soldered to the
rail. This diagram shows how wrapping one wire around the other
makes a junction between wires before soldering them. All non-insulating
rail joiners can be soldered and separate feeder wires be installed
every 3 ft of track. |
 |
Quick
Tip: |
If you detect any problems during these tests, then it is an indication that something is wrong in the wiring. The problem should be fixed before going any further (remember that, with DCC, all track sections are wired in parallel and insulating a problem later will be much more difficult). When all sections are correctly wired, your layout will be ready for DCC control of trains.
Here is a method used by many modelers. Purchase some doorbell wire and cut it into 6" to 9" lengths. Strip the last half-inch on both sides of the wire. Flattened the end of the wire using some needle nose pliers and pull the wire downward to form a 90 degree bend just before the flattened end and then clip the end short. If you do this correctly you'll end up with a piece of wire that looks like a track spike.
The next thing is to drill a small hole next to the outside of the rail through the roadbed and base. Use a soldering iron to put some solder next to the feeder hole, then a dab on the flattened end of the wire (the part that looks like a spike). You then feed the straight side of the wire through the feeder hole. The trick is to align the spike side so that it is hanging off the bottom of the rail. You then simply solder the joint.
Using this method, you'll have a feeder and reliable power transfer that resembles a rail spike. It should be almost impossible to detect at a glance.
Return
to top of page
How To Solder Joints And Take
Care Of Those Wire Connections
Good soldering is important, because poor electrical connections result in higher electrical resistance with heat generated when power is applied to a poor electrical connection. Over time, this heat has the potential to damage wire insulation and wire enamel.
To avoid electrical connection problems it pays to regularly inspect wire connections. A solder joint that is a dull silver color, or one that is just a "big blob" of solder, will sooner or later cause problems when running your model trains.
All solder connections should be clean and shiny and use only a small amount of solder. If a solder joint is suspect, take a soldering iron and apply fresh solder to the joint. This will help improve the connection and keep your electrical system in good working order.
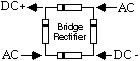
What is a bridge rectifier and what does it do?
A bridge rectifier will permit the trains to go around it in one
direction either clockwise or counterclockwise. Converting AC to
DC is done with a bridge rectifier, or with four diodes configured
to make a bridge rectifier (a diode is a device that lets electricity
flow in only one direction). So, when four diodes are configured
as shown here, the rail's AC power is converted to DC. |
 |
How
do you run a loco on a reversing loop?
Do you have to stop the train on the loop and throw the switch?
A common method of wiring reversing loops uses a bridge rectifier to set the polarity of the loop so that trains can run around the loop in one direction only. A bridge rectifier should be rated for several amps and have four inputs, two marked ‘AC’, with one marked '+' and one marked '-'. The first thing to do is connect the ACs to the mainline power feeds, then connect the '+' and '–' to each wire that feeds the reverse loop. The bridge rectifier will keep the train running in the same direction … either clockwise or counterclockwise, depending upon the + connection being hooked to the right or left rail. When the train exits the loop, the track polarity outside the loop has changed to match the rails at the exit of the loop.
Quick
Tip: |
What are the advantages of using an iron core can motor?
Their major advantage is that they are rugged and cheap. The can motor gets its name from the formed steel can it is built in. These are permanent magnet DC motors and usually come with the armature wound on an iron core. Iron core motors can generate an amazing amount of power in a small physical size. Can type motors are not usually designed to be disassembled for repair. If a motor wears out or burns out, buying a new one is usually the cheapest option. Most of the motors found in Large Scale locos are iron core can motors.
What is coreless motor and how does it work?
Coreless motors are so named because there is no iron core in the armature. A coreless motor consists of a rotor with coils of wire resembling an open basket. A magnet is located in the center of the coils. A brush gear transfers the electrical current to the rotating coils. The outside of the motor has a can that encloses all the parts, so it may still look like a can motor.
The advantage of the coreless motor is that it can be made smaller and lighter than a cored design. Since they run slowly, a lower gear ratio can be used than with the more conventional iron-cored motor.
The downside; is that the coreless motor doesn't have the thermal stability of a cored motor. An overworked motor will heat very rapidly. If it gets hot enough, it can breakdown the adhesives holding it together, and the armature will simply come apart.
If treated properly, coreless motors will last a long time.
Quick
Tip: |
What is a decoder
and can I run an analog locomotive
on a DCC system
without a decoder?
The first thing to understand is this; an analog train refers to a locomotive without a decoder chip installed in the locomotive.
Decoders are sometimes called receivers, but in reality, they are more that just receivers. Decoders decode the DCC signal and control the engine's speed and direction. Decoders let you program locomotive characteristics like acceleration, deceleration and, starting and mid-point voltages. Some may have built in light and function controls as well.
There are other decoders that include sound and motion control in a single unit. You can even build decoders yourself from a kit.
The two main components of a DCC system are the controller and the decoder. The controller (some systems also require a booster) has the throttles and other controls to operate your trains as well as accessories. The decoder is installed into the locomotive and as instructions are sent from the controller through the tracks to the decoder it “decodes” the instructions and responds accordingly which may be to turn a light on, move forward, or stop, etc. Each decoder has to have a unique address so that the controller can individually identify it.
With most DCC systems you can run one analog locomotive (without a decoder) along with the digital ones. This allows you time to gradually convert your fleet.
Can I just put a decoder in my old analog engines?
Yes you can, but you probably don’t want to. If the motor pulls over an amp at stall then it will burn up the decoder. The other issue is that most of the older analog engines require a fair amount of work to isolate the motor from the frame.
Can I put a decoder in my brass engines?
Again, the answer is basically yes, as there are very few engines that cannot have a decoder in them. But you may not want to because of the motor, load, etc. Again, the stall current could burn out the decoder. Be careful not to do any damage.
What if the locomotives are too small or too valuable to be converted, but you still want to run them on your DCC layout?
If you have an unconverted locomotive to run on your layout, then your DCC system will probably be able to handle it. No more than one analog engine at a time on Digital for the whole layout.
And, if you want to run your DCC equipped locomotive on a regular DC layout, many DCC decoders automatically convert to DC operation if there is no DCC signal present. The important thing is to check with your manufacturer about the availability of this feature.
Why does my locomotive make a noise when not moving?
Analog locomotives tend to "sing" when sitting still on DCC layouts. This noise decreases when the analog locomotive runs and accelerates. The noise is caused by the DCC track signal. Using conductive brush lubricants (such as "Conducta") can significantly reduce this noise. It is also a good idea to ensure that there is no vibration inside the locomotive that will add to the noise generated.
Quick
Tip: |
What do I have to do to my layout to make it DCC?
Well, if you have one loco that has a decoder in it then you are already doing DCC. If you already have a working layout, then usually, it is just a case of removing the two wires from the transformer to the track and putting in the computer (Command Station/Booster) between them. DCC doesn't need to be complicated or difficult. It can be as challenging as you want it to be. It is entirely over to you.
Are 'O-gauge' and 'O-scale' the same thing?
The difference between the two confuses a lot of people... so I'll explain it carefully. The fact is; O-gauge is far more popular than O scale, although the term 'O scale' is more widely referred to. Why? Because, most beginners (and many experienced enthusiasts) use the term 'O scale' when they really mean 'O gauge'.
'O' denotes 1/48th scale. O-gauge uses 3-rail track which is not quite to scale (it sits a little higher than scale). This is because O-gauge rail cars and trains have wheels with large flanges to prevent derailments. Some O-gauge train sets also have shorter-than-scale engines and rolling stock so that they can easily go around tight curves.
Some modelers use three-rail O gauge track to try and create a realistic-looking layout, whereas others use two-rail track of a properly-scaled height, the cars are scale length, their layouts have wide, realistic curves, etc.
Are "three-rail" trains on the way out?
Lionel three-rail O gauge track dates to 1915, and the technology that necessitated the creation of a center rail has long ago been surpassed. Technology-wise, there's no need today for O gauge trains to have a center rail.
Today, some high-end locomotives have a convertible two-rail/three-rail configuration. To change a locomotive from one type of track to the other requires the removal or addition of center-rail pickup rollers followed by a simply flick of a switch discreetly located on the locomotive.
However, many enthusiast are not in favor of this idea and prefer to recreate things exactly as they once were without modifications. Also, it is fair to say that many modelers have invested a lot of time, effort and money into three-rail trains and are not that keen on switching to a two-rail system.
For those who have 20 to 50 engines, changing to a two-rail layout would be a big decision. Some might consider adding a loop of two-rail track as a bit of a compromise. But, the older trains are not easily converted so they may not want to change over completely. That is why there will continue to be a market for three-rail trains.
Return
to top of page
How much are my trains worth?
The simple answer is that they're worth what someone is prepared to pay. They may have sentimental value, but be worth far less to someone else than they're worth to you. On the other hand if they are in mint condition, or particularly rare, or in high demand, or short supply … then you might be pleasantly surprised at how much you can get for them. Here are some ways to find out what your trains are worth:
- One of the best ways to assess value is to attend swap meets or a model railroad show and ask some of the knowledgeable and experienced enthusiasts who attend events like that.
- Check with hobby shops that deal in model railways. If you decide to sell to a retailer, remember that you're selling at wholesale. You probably get about 50 percent of the value listed in price guides. The retailer has rents, wages etc to pay and will expect to make some profit on the transaction when reselling your trains. For you it is a hobby – for them it is a business.
- Consult price guides, which can be purchased at hobby shops and from publishers.
- Do some research on eBay and other auction sites to see how much similar sets are selling for, or more importantly, have sold for.
There are a number of factors that can affect the value of your trains and determine what someone might be prepared to pay for them. Before approaching a dealer, going to a swap meet, or searching eBay, you will firstly need to accurately identify your trains. You'll need to know what their gauge is (measure the distance between its wheels), which company made them, and what number was assigned to them (look for names and numbers on the sides and bottom of models).
Secondly, you have to realistically assess the condition of your trains. Here is a guide for you:
Mint Condition: Brand new, often in its original, unopened packaging with all original paperwork included.
Like New Condition: As the name implies the original condition throughout. Free of any blemishes, scratches or nicks. All boxes should be in pristine condition as they are often are sold with them.
Excellent Condition: Means exceptionally clean, maybe with minute scratches or nicks but definitely no dents or rust.
Very Good Condition: They'll be clean, possibly with a few noticeable scratches. They will otherwise be free of dents, rust, and warping.
Good Condition: Signs of use, possibly with some scratches and small dents and dirty spots.
Fair Condition: Definite signs of use including lots of scratched, being chipped, dented, rusted, or warped.
Poor Condition: Sometimes bought for parts or restoration. They will be particularly beat-up or worn out.
Having determined what your trains are worth, you'll then be in a better position to decide whether to keep, give them away, or sell them.
Quick
Tip: Using a hacksaw
will create metal dust which is hard to clean up. Wire cutter
pliers will save you the shavings, but will create angles on your
ends which you'll need to file square to prevent rolling stock
from jumping the track. You can buy special track cutting tools
with a flat edge on one side so that the resulting cut is straight
instead of tapered to a point. |
Return
to top of page
© 2006 Robert
Anderson, Market Leaders Ebooks, all
rights reserved